Week 3 [Mon, Aug 26th] - Topics

Similar to last week, most topics for this week are TIC2002 topics given here for reference. But there are some new topics too (they are marked by one of these icons: , , , : OPTIONAL)

Detailed Table of Contents


Guidance for the item(s) below:

While you can (and will be) defining your own classes, Java comes with a whole bunch of built-in classes that you can use right-away. Let's learn about some of the most useful such built-in classes next.

[W3.1] Java: Useful Classes

W3.1a

C++ to Java → Some Useful Classes → Java API

Video

Can use Java API documentation about classes

Java comes with a rich collection of classes that you can use. They form what is known as the Java API (Application Programming Interface). Each class in the API comes with documentation in a standard format.


W3.1b

C++ to Java → Some Useful Classes → The String class

Video

Can use the String class

String is a built-in Java class that you can use without importing. Given below are some useful String methods:

Find characters of a string

Strings provide a method named charAt, which extracts a character. It returns a char, a primitive type that stores an individual character (as opposed to strings of them).

String fruit = "banana";
char letter = fruit.charAt(0);

The argument 0 means that we want the letter at position 0. Like array indexes, string indexes start at 0, so the character assigned to letter is 'b'.

You can convert a string to an array of characters using the toCharArray method.

char[] fruitChars = fruit.toCharArray()
Change a string to upper/lower case

Strings provide methods, toUpperCase and toLowerCase, that convert from uppercase to lowercase and back.

After these statements run, upperName refers to the string "ALAN TURING" but name still refers to "Alan Turing".

String name = "Alan Turing";
String upperName = name.toUpperCase();
System.out.println(name);
System.out.println(upperName);

Alan Turing
ALAN TURING

Note that a string method cannot change the string object on which the method is invoked, because strings are . For example, when you invoke toUpperCase on a string "abc", you get a new string object "ABC" as the return value rather than the string "abc" being changed to "ABC". As a result, for such string methods that seemingly modify the string but actually return a new string instead e.g., toLowerCase, invoking the method has no effect if you don’t assign the return value to a variable.

String s = "Ada";
s.toUpperCase(); // no effect
s = s.toUpperCase(); // the correct way
Replacing parts of a string

Another useful method is replace, which finds and replaces instances of one string within another.

This example replaces "Computer Science" with "CS".

String text = "Computer Science is fun!";
text = text.replace("Computer Science", "CS");
System.out.println(text);

CS is fun!
Accessing substrings

The substring method returns a new string that copies letters from an existing string, starting at the given index.

  • "banana".substring(0) "banana"
  • "banana".substring(2) "nana"
  • "banana".substring(6) ""

If it’s invoked with two arguments, they are treated as a start and end index:

  • "banana".substring(0, 3) "ban"
  • "banana".substring(2, 5) "nan"
  • "banana".substring(6, 6) ""
Searching within strings

The indexOf method searches for a single character (or a substring) in a string and returns the index of the first occurrence. The method returns -1 if there are no occurrences.

  • "banana".indexOf('a') 1
  • "banana".indexOf('a', 2) 3 searches for 'a', starting from position 2
  • "banana".indexOf('x') -1
  • "banana".indexOf("nan") 2 searches for the substring "nan"
Comparing strings

To compare two strings, it is tempting to use the == and != operators.

String name1 = "Alan Turing";
String name2 = "Alan Turing";
System.out.println(name1 == name2);

This code compiles and runs, and most of the time it shows true. But it is not correct. The problem is, , the == operator checks whether the two variables refer to the same object (by comparing the references). If you give it two different string objects that contain the same letters, it is supposed to yield false because they are two distinct objects even if they contain the same text. However, because Java strings are immutable, in some cases (but not always) Java reuses existing string objects instead of creating multiple objects, which can cause the above code to yield true. Therefore, it is not safe to use == to compare strings if your intention is to check if they contain the same text.

The right way to compare strings is with the equals method.

This example invokes equals on name1 and passes name2 as an argument. The equals method returns true if the strings contain the same characters; otherwise it returns false.

if (name1.equals(name2)) {
    System.out.println("The names are the same.");
}

If the strings differ, you can use compareTo to see which comes first in alphabetical order. The return value from compareTo is the difference between the first characters in the strings that differ. If the strings are equal, their difference is zero. If the first string (the one on which the method is invoked) comes first in the alphabet, the difference is negative. Otherwise, the difference is positive.

In this example, compareTo returns positive 8, because the second letter of "Alan" comes 8 letters after the second letter of "Ada".

String name1 = "Alan";
String name2 = "Ada";
int diff = name1.compareTo(name2);
if (diff == 0) {
    System.out.println("The names are the same.");
} else if (diff < 0) {
    System.out.println("name1 comes before name2.");
} else if (diff > 0) {
    System.out.println("name2 comes before name1.");
}

Both equals and compareTo are case-sensitive. The uppercase letters come before the lowercase letters, so "Ada" comes before "ada". To check if two strings are similar irrespective of the differences in case, you can use the equalsIgnoreCase method.

String s1 = "Apple";
String s2 = "apple";
System.out.println(s1.equals(s2)); //false
System.out.println(s1.equalsIgnoreCase(s2)); //true

Some more comparison-related String methods:

  • contains: checks if one string is a sub-string of the other e.g., Snapple and app
  • startsWith: checks if one string has the other as a substring at the beginning e.g., Apple and App
  • endsWith: checks if one string has the other as a substring at the end e.g., Crab and ab
Printing special characters (line breaks, tabs, ...)

You can embed a special character e.g., line break, tab, backspace, etc. in a string using an escape sequence.

Escape sequence meaning
\n newline character
\t tab character
\b backspace character
\f form feed character
\r carriage return character
\" " (double quote) character
\' ' (single quote) character
\\ \ (back slash) character
\uDDDD character from the Unicode character set, by specifying the Unicode as four hex digits in the place of DDDD

An example of using escape sequences to print some special characters.

System.out.println("First line\nSecond \"line\"");

First line
Second "line"

As the behavior of the \n , the recommended way to print a line break is using the System.lineSeparator() as it works the same in all platforms.

Using System.lineSeparator() to print a line break.

System.out.println("First" + System.lineSeparator() + "Second");

First
Second
String formatting

Sometimes programs need to create strings that are formatted in a certain way. String.format takes a format specifier followed by a sequence of values and returns a new string formatted as specified.

The following method returns a time string in 12-hour format. The format specifier \%02d means “two digit integer padded with zeros”, so timeString(19, 5) returns the string "07:05 PM".

public static String timeString(int hour, int minute) {
    String ampm;
    if (hour < 12) {
        ampm = "AM";
        if (hour == 0) {
            hour = 12;  // midnight
        }
    } else {
        ampm = "PM";
        hour = hour - 12;
    }

    // returns "07:05 PM"
    return String.format("%02d:%02d %s", hour, minute, ampm);
}

Exercises:

[Key Exercise] printPrice method

Implement the printPrice method in the code below to produce the given output. Its behavior:

  • The parameter item is a string in the format name--$price i.e., a name and a price of an item separated using a -- e.g., banana--$3/50
  • It prints the NAME: price where the name is in upper case. The price does not have a $ sign and has . in place of the /
    e.g., banana--$3/50 BANANA: 3.50
  • The name part of the input can have trailing/leading spaces which should be omitted from the output.
    e.g., banana --$3/50 BANANA: 3.50

Do a Web search to find how to remove leading/trailing spaces. Suggested search terms java string remove leading trailing spaces

public class Main {

    public static void printPrice(String item) {
        // TODO: add your code here

    }

    public static void main(String[] args) {
        printPrice("sandwich  --$4/50");
        printPrice("  soda --$10/00");
        printPrice("  fries --$0/50");
    }
}

SANDWICH: 4.50
SODA: 10.00
FRIES: 0.50

Hint


W3.1c

C++ to Java → Some Useful Classes → Wrapper Classes for primitive types

Video

Can use wrapper classes for primitive

Primitive values (like int, double, and char) do not provide methods.

For example, you can’t call equals on an int:

int i = 5;
System.out.println(i.equals(5));  // compiler error

But for each primitive type, there is a corresponding class in the Java library, called a wrapper class, as given in the table below. They are in the java.lang package i.e., no need to import.

Primitive type Wrapper class
byte Byte
short Short
int Integer
long Long
float Float
double Double
char Character
boolean Boolean

Double d = new Double(2.5);
int i = d.intValue();
System.out.println(d);
System.out.println(i);

2.5
2

Each wrapper class defines constants MIN_VALUE and MAX_VALUE.

Accessing max and min values for integers:

System.out.println(Integer.MIN_VALUE + " : " + Integer.MAX_VALUE);

-2147483648 : 2147483647

Wrapper classes provide methods for strings to other types e.g., Integer.parseInt converts a string to (you guessed it) an integer. The other wrapper classes provide similar methods, like Double.parseDouble and Boolean.parseBoolean.

Integer.parseInt("1234") 1234

Wrapper classes also provide toString, which returns a string representation of a value.

Integer.toString(1234) "1234"


Exercises:

[Key Exercise] printTotalScore method

Implement the printTotalScore method in the code below to produce the given output. Its behavior:

  • values is an array of strings, each string representing an integer e.g., ["5", "-1"]
  • The method prints the total of the numbers represented by the strings in the array
    ["5", "-1"] 4
public class Main {

    public static void printTotalScore(String[] values){
        // TODO: add your code here
    }

    public static void main(String[] args) {
        printTotalScore(new String[]{});
        printTotalScore(new String[]{"0", "124", "-15"});
    }
}

0
109


W3.1d

C++ to Java → Some Useful Classes → The Arrays class

Video

Can use the Arrays class

java.util.Arrays provides methods for working with arrays. One of them, toString, returns a string representation of an array. It also provides a copyOf that copies an array.

Using Arrays.copyOf and Arrays.toString:

int[] a = new int[]{1,2,3,4};

int[] b = Arrays.copyOf(a, 3); // copy first three elements
System.out.println(Arrays.toString(b));

int[] c = Arrays.copyOf(a, a.length); // copy all elements
System.out.println(Arrays.toString(c));

[1, 2, 3]
[1, 2, 3, 4]

Exercises:

[Key Exercise] filterEmails method

Implement the following two methods in the code below to produce the given output.

  • filterEmails(String[] items): String[]
    • items is an array of strings each of which may be an email address or some other random string
    • Returns a String[] containing email addresses that were in items. Any string containing @ is considered as an email.
      ["aaa@bbb", "xyz"] ["aaa@bbb"]
  • printItems(String[] items)
    • Prints items in the standard array format. e.g., ["aaa", "bbb"] [aaa, bbb]
import java.util.Arrays;

public class Main {
    public static String[] filterEmails(String[] items){
        // TODO: add your code here
    }

    public static void printItems(String[] items){
        // TODO: add your code here
    }

    public static void main(String[] args) {
        printItems(filterEmails(new String[]{}));
        printItems(filterEmails(new String[]{"abc"}));
        printItems(filterEmails(new String[]{"adam@example.com", "aab", "john@example.com", "some@"}));
        printItems(filterEmails(new String[]{"xyz", "@bee.com", "aab"}));
    }
}

[]
[]
[adam@example.com, john@example.com, some@]
[@bee.com]

Hint


W3.1e

C++ to Java → Some Useful Classes → The Scanner class

Video

Can use the Scanner class

Scanner is a class that provides methods for inputting words, numbers, and other data. Scanner provides a method called nextLine that reads a line of input from the keyboard and returns a String. The following example reads two lines and repeats them back to the user:

import java.util.Scanner;

public class Echo {

    public static void main(String[] args) {
        String line;
        Scanner in = new Scanner(System.in);

        System.out.print("Type something: ");
        line = in.nextLine();
        System.out.println("You said: " + line);

        System.out.print("Type something else: ");
        line = in.nextLine();
        System.out.println("You also said: " + line);
    }
}

Scanner class normally reads inputs as strings but it can read in a specific type of input too.

The code below uses the nextInt method of the Scanner class to read an input as an integer.


Scanner in = new Scanner(System.in);

System.out.print("What is your age? ");
int age = in.nextInt();
in.nextLine();  // read the new-line character that follows the integer
System.out.print("What is your name? ");
String name = in.nextLine();
System.out.printf("Hello %s, age %d\n", name, age);

Note the use of printf method for formatting the output.


Exercises:

[Key Exercise] find total expenditure

Write a program to ask the user for a description of overseas expenses (presumably, the user has just returned from an overseas trip) and calculate the total in local currency.

  • The conversion rate from overseas currency to local currency : overseas $1.0 = local $1.70
  • The user can describe expenses is in free form text, as one line. The program takes all amounts mentioned in the format $amount e.g., $1.50

Here is one example output:

Your expenses while overseas?beer $4.50 books $3.00 $5.00 for food, that's all
Expenses in overseas currency:[$4.50, $3.00, $5.00]
Total in local currency: $21.25

Here is another:

Your expenses while overseas?nothing. I lived off my friends all the time.
Expenses in overseas currency:[]
Total in local currency: $0.00

One more:

Your expenses while overseas? Just $10
Expenses in overseas currency:[$10]
Total in local currency: $17.00

Here's the skeleton code to use as the starting point:

public class Main {

    // You can add more methods here

    public static void main(String[] args) {
        String line;
        Scanner in = new Scanner(System.in);

        System.out.print("Your expenses while overseas?");
       // TODO: add your code here
    }
}

You can use the split method of the String class to convert a sentence into an array of words. e.g.,

String sentence = "hello my dear";

// split using the space as the delimiter
String[] words = sentence.split(" ");

System.out.println(Arrays.toString(words));

[hello, my, dear]

Hint


Guidance for the item(s) below:

Having learned how to use Git in your own computer, let's also learn a bit about working with remote repositories too.

[W3.2] RCS: Remote Repos

W3.2a

Project Management → Revision Control → Remote repositories

Video

Can explain remote repositories

Remote repositories are repos that are hosted on remote computers and allow remote access. They are especially useful for sharing the revision history of a codebase among team members of a multi-person project. They can also serve as a remote backup of your codebase.

It is possible to set up your own remote repo on a server, but the easier option is to use a remote repo hosting service such as GitHub or BitBucket.

You can clone a repo to create a copy of that repo in another location on your computer. The copy will even have the revision history of the original repo i.e., identical to the original repo. For example, you can clone a remote repo onto your computer to create a local copy of the remote repo.

When you clone from a repo, the original repo is commonly referred to as the upstream repo. A repo can have multiple upstream repos. For example, let's say a repo repo1 was cloned as repo2 which was then cloned as repo3. In this case, repo1 and repo2 are upstream repos of repo3.

You can pull (or fetch) from one repo to another, to receive new commits in the second repo, but only if the repos have a shared history. Let's say some new commits were added to the after you cloned it, and you would like to copy over those new commits to your own clone i.e., sync your clone with the upstream repo. In that case, you can pull from the upstream repo to your clone.

You can push new commits in one repo to another repo which will copy the new commits onto the destination repo. Note that pushing to a repo requires you to have write-access to it. Furthermore, you can push between repos only if those repos have a shared history among them (i.e., one was created by copying the other at some point in the past).

Cloning, pushing, and pulling/fetching can be done between two local repos too, although it is more common for them to involve a remote repo.

A repo can work with any number of other repositories as long as they have a shared history e.g., repo1 can pull from (or push to) repo2 and repo3 if they have a shared history between them.

A fork is a remote copy of a remote repo. As you know, cloning creates a local copy of a repo. In contrast, forking creates a remote copy of a repo hosted on remote service such as GitHub. This is particularly useful if you want to play around with a GitHub repo, but you don't have write permissions to it; you can simply fork the repo and do whatever you want with the fork as you are the owner of the fork.

A pull request (PR for short) is a mechanism for contributing code to a remote repo i.e., "I'm requesting you to pull my proposed changes to your repo". It's feature provided by RCS platforms such as GitHub. For this to work, the two repos must have a shared history. The most common case is sending PRs from a fork to its repo.

Here is a scenario that includes all the concepts introduced above (click inside the slide to advance the animation):


W3.2b

Tools → Git and GitHub → clone: Copying a repo

Video

Can clone a remote repo

Given below is an example scenario you can try yourself to learn Git cloning.

Suppose you want to clone the sample repo samplerepo-things to your computer.

Note that the URL of the GitHub project is different from the URL you need to clone a repo in that GitHub project. e.g.

GitHub project URL: https://github.com/se-edu/samplerepo-things
Git repo URL: https://github.com/se-edu/samplerepo-things.git (note the .git at the end)

FileClone / New… and provide the URL of the repo and the destination directory.


You can use the clone command to clone a repo.

Follow the instructions given here.


W3.2c

Tools → Git and GitHub → pull, fetch: Downloading data from other repos

Video

Can pull changes from a repo

Here's a scenario you can try in order to learn how to pull commits from another repo to yours.

1. Clone a repo (e.g., the repo used in [Git & GitHub → Clone]) to be used for this activity.

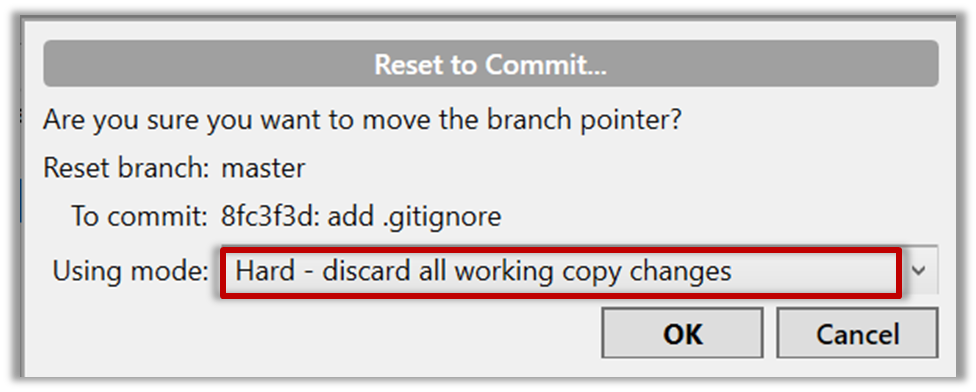
2. Delete the last few commits to simulate cloning the repo a few commits ago.

Right-click the target commit (i.e. the commit that is 2 commits behind the tip) and choose Reset current branch to this commit.

Choose the Hard - … option and click OK.

This is what you will see.

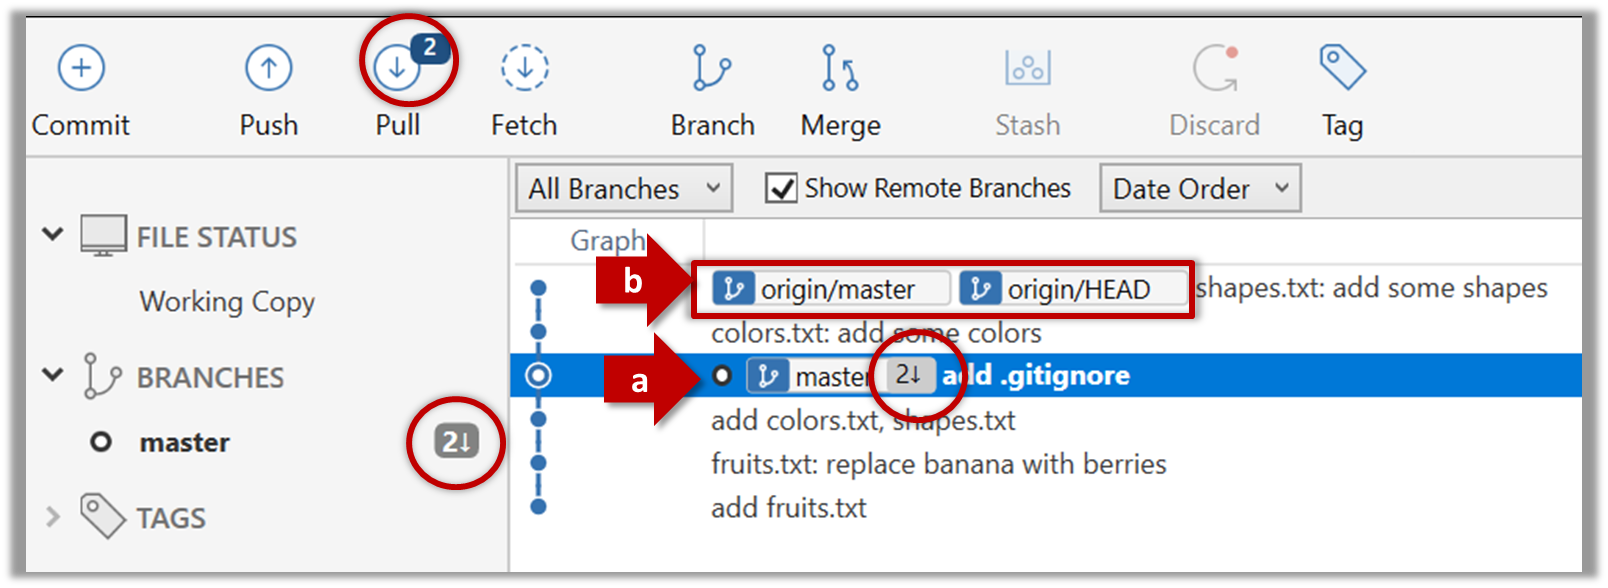
Note the following (cross-refer the screenshot above):

  • Arrow marked as a: The local repo is now at this commit, marked by the master label.
  • Arrow marked as b: The origin/master label shows what is the latest commit in the master branch in the remote repo. origin is the default name given to the upstream repo you cloned from. You can ignore the origin/HEAD label for now.

Use the reset command to delete commits at the tip of the revision history.

$ git reset --hard HEAD~2

More info on the git reset command can be found here.


Now, your local repo state is exactly how it would be if you had cloned the repo 2 commits ago, as if somebody has added two more commits to the remote repo since you cloned it.

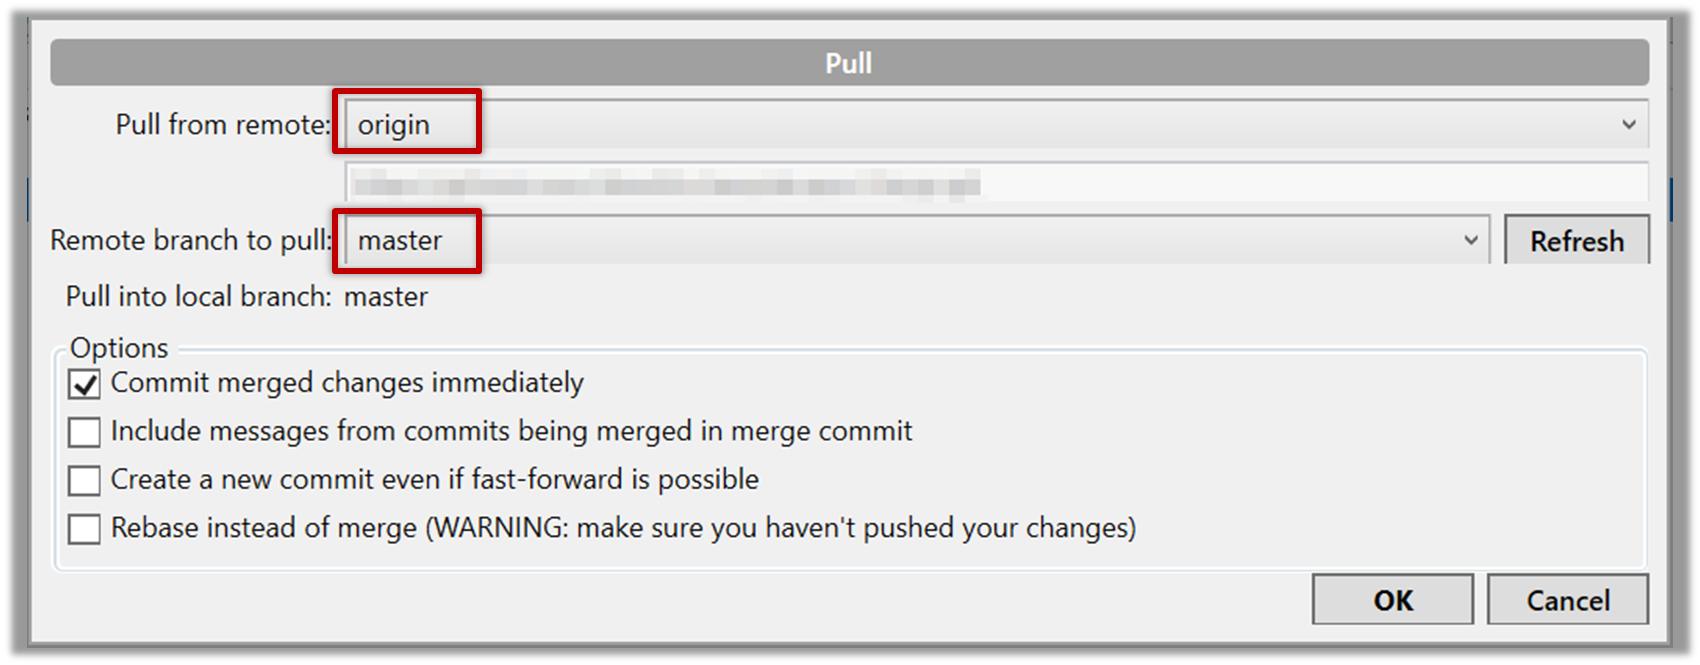
3. Pull from the remote repo: To get those missing commits to your local repo (i.e. to sync your local repo with upstream repo) you can do a pull.

Click the Pull button in the main menu, choose origin and master in the next dialog, and click OK.

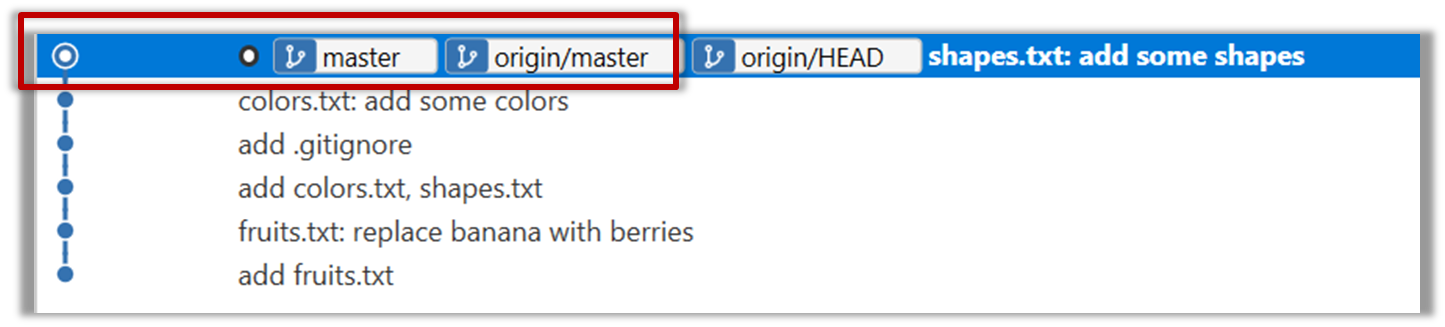
Now you should see something like this where master and origin/master are both pointing the same commit.


$ git pull origin

You can also do a fetch instead of a pull in which case the new commits will be downloaded to your repo but the working directory will remain at the current commit. To move the current state to the latest commit that was downloaded, you need to do a merge. A pull is a shortcut that does both those steps in one go.

Working with multiple remotes

When you clone a repo, Git automatically adds a remote repo named origin to your repo configuration. As you know, you can pull commits from that repo. Furthermore, a Git repo can work with remote repos other than the one it was cloned from.

To communicate with another remote repo, you can first add it as a remote of your repo. Here is an example scenario you can follow to learn how to pull from another repo:

  1. Open the local repo in Sourcetree. Suggested: Use your local clone of the samplerepo-things repo.

  2. Choose RepositoryRepository Settings menu option.

  3. Add a new remote to the repo with the following values.

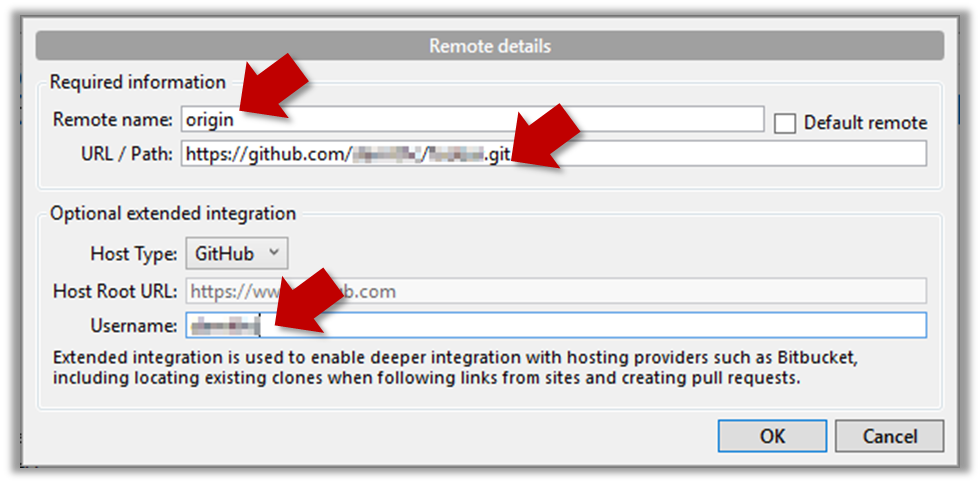
    • Remote name: the name you want to assign to the remote repo e.g., upstream1
    • URL/path: the URL of your repo (ending in .git) that. Suggested: https://github.com/se-edu/samplerepo-things-2.git (samplerepo-things-2 is another repo that has a shared history with samplerepo-things)
    • Username: your GitHub username

  4. Now, you can fetch or pull (pulling will fetch the branch and merge the new code to the current branch) from the added repo as you did before but choose the remote name of the repo you want to pull from (instead of origin):
    Click the Fetch button or the Pull button first.

    If the Remote branch to pull dropdown is empty, click the Refresh button on its right.

  5. If the pull from the samplerepo-things-2 was successful, you should have received one more commit into your local repo.


  1. Navigate to the folder containing the local repo.

  2. Set the new remote repo as a remote of the local repo.
    command: git remote add {remote_name} {remote_repo_url}
    e.g., git remote add upstream1 https://github.com/johndoe/foobar.git

  3. Now you can fetch or pull (pulling will fetch the branch and merge the new code to the current branch) from the new remote.
    e.g., git fetch upstream1 master followed by git merge upstream1/master, or,
    git pull upstream1 master


W3.2d

Tools → Git and GitHub → Fork: Creating a remote copy

Video

Can fork a repo

Given below is a scenario you can try in order to learn how to fork a repo:.

0. Create a GitHub account if you don't have one yet.

1. Go to the GitHub repo you want to fork e.g., samplerepo-things

2. Click on the button on the top-right corner. In the next step,

  • choose to fork to your own account or to another GitHub organization that you are an admin of.
  • Un-tick the [ ] Copy the master branch only option, so that you get copies of other branches (if any) in the repo.

As you might have guessed from the above, forking is not a Git feature, but a feature provided by remote Git hosting services such as Github.

GitHub does not allow you to fork the same repo more than once to the same destination. If you want to re-fork, you need to delete the previous fork.


W3.2e

Tools → Git and GitHub → push: Uploading data to other repos

Video

Can push to a remote repo

Given below is a scenario you can try in order to learn how to push commits to a remote repo hosted on GitHub:

1. Fork an existing GitHub repo (e.g., samplerepo-things) to your GitHub account.

2. Clone the fork (not the original) to your computer.

3. Commit some changes in your local repo.

4. Push the new commits to your fork on GitHub

Click the Push button on the main menu, ensure the settings are as follows in the next dialog, and click the Push button on the dialog.


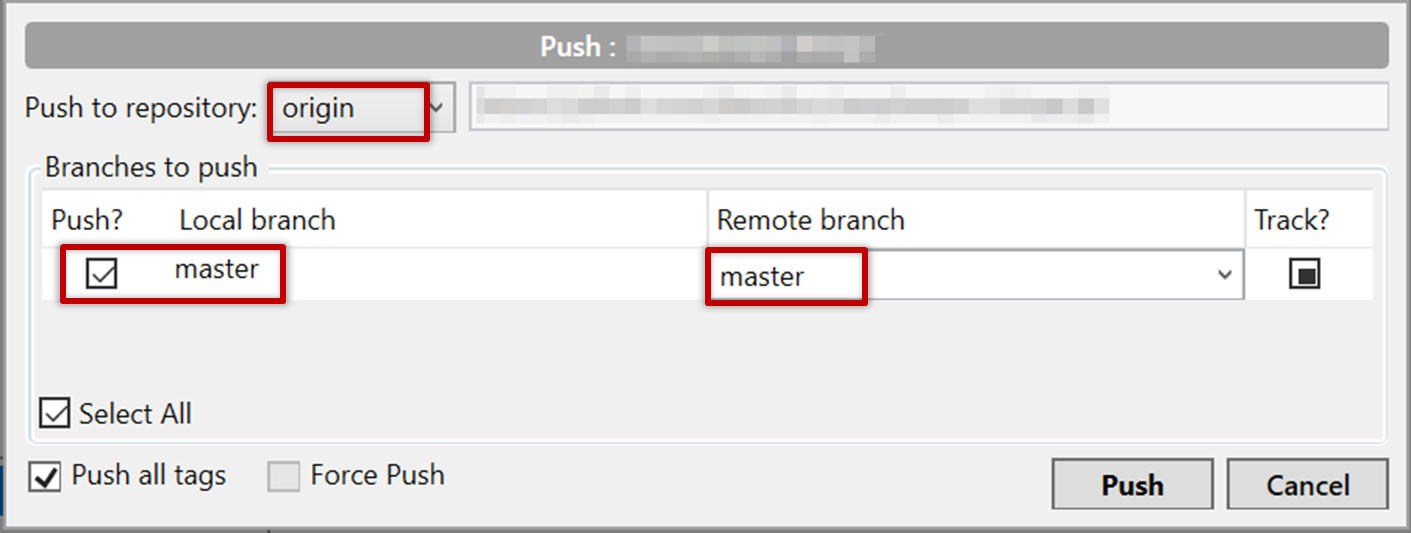
Use the command git push origin master. Enter your Github username and password when prompted.


5. Add a few more commits, and tag some of them.

6. Push the new commits and the tags.

Push similar to before, but ensure the [ ] Push all tags option in the push dialog is ticked as well.


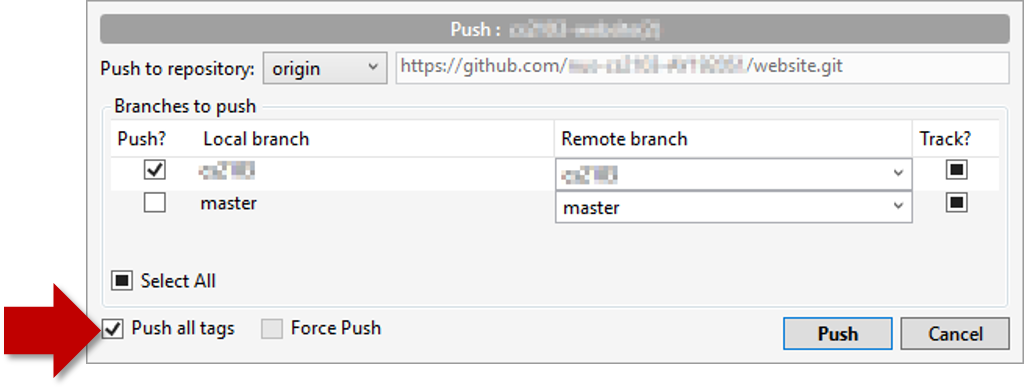
A normal push does not include tags. After pushing the commits (as before), push tags to the repo as well:

To push a specific tag:

$ git push origin v1.0b

To push all tags:

$ git push origin --tags

You can push to repos other than the one you cloned from, as long as the target repo and your repo have a shared history.

  1. Add the GitHub repo URL as a remote, if you haven't done so already.
  2. Push to the target repo.

Push your repo to the new remote the usual way, but select the name of target remote instead of origin and remember to select the Track checkbox.


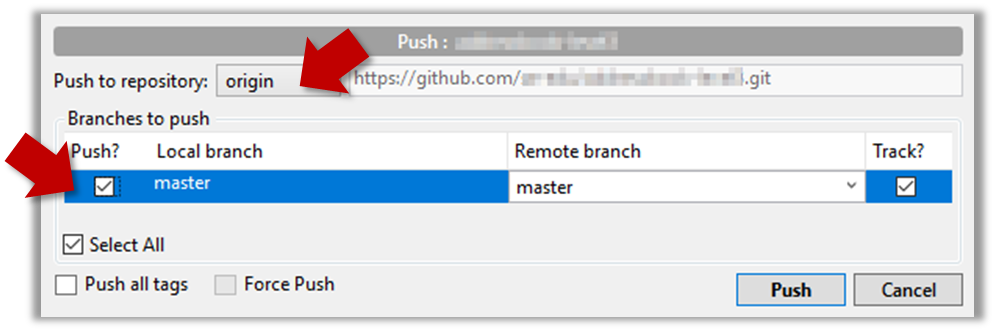
Push to the new remote the usual way e.g., git push upstream1 master (assuming you gave the name upstream1 to the remote).


You can even push an entire local repository to GitHub, to form an entirely new remote repository. For example, you created a local repo and worked with it for a while but now you want to upload it onto GitHub (as a backup or to share it with others). The steps are given below.

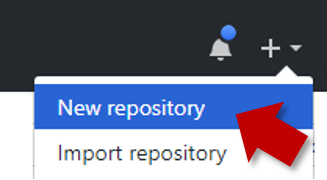
1. Create an empty remote repo on GitHub.

  1. Login to your GitHub account and choose to create a new Repo.

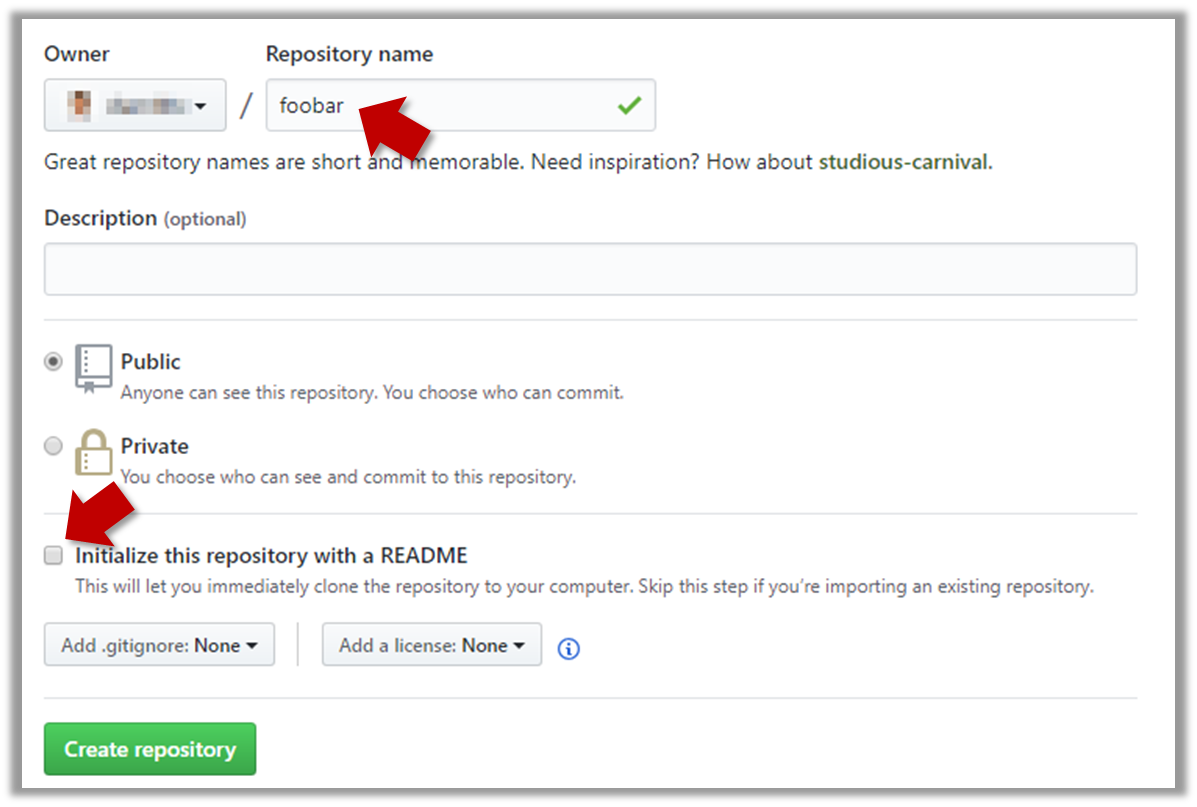
  2. In the next screen, provide a name for your repo but keep the Initialize this repo ... tick box unchecked.

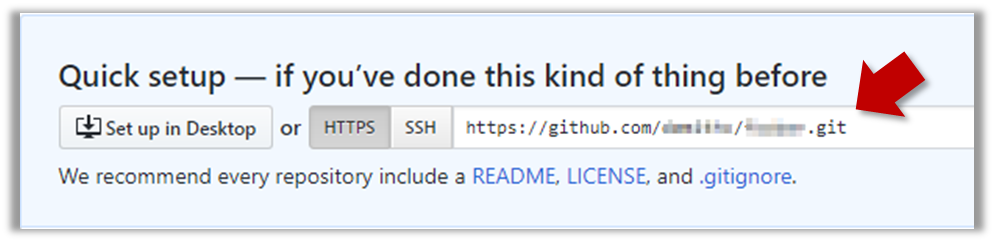
  3. Note the URL of the repo. It will be of the form https://github.com/{your_user_name}/{repo_name}.git.
    e.g., https://github.com/johndoe/foobar.git (note the .git at the end)

2. Add the GitHub repo URL as a remote of the local repo. You can give it the name origin (or any other name).

3. Push the repo to the remote.


Push each branch to the new remote the usual way but use the -u flag to inform Git that you wish to the branch.
e.g., git push -u origin master


Guidance for the item(s) below:

As you are likely to be using an IDE for the project, let's learn at least enough about IDEs to get you started using one.

[W3.3] IDEs: Basic Features

W3.3a

Implementation → IDEs → What

Can explain IDEs

Professional software engineers often write code using Integrated Development Environments (IDEs). IDEs support most development-related work within the same tool (hence, the term integrated).

An IDE generally consists of:

  • A source code editor that includes features such as syntax coloring, auto-completion, easy code navigation, error highlighting, and code-snippet generation.
  • A compiler and/or an interpreter (together with other build automation support) that facilitates the compilation/linking/running/deployment of a program.
  • A debugger that allows the developer to execute the program one step at a time to observe the run-time behavior in order to locate bugs.
  • Other tools that aid various aspects of coding e.g. support for automated testing, drag-and-drop construction of UI components, version management support, simulation of the target runtime platform, modeling support, AI-assisted coding help, collaborative coding with others.

Examples of popular IDEs:

  • Java: Eclipse, IntelliJ IDEA, NetBeans
  • C#, C++: Visual Studio
  • Swift: XCode
  • Python: PyCharm
  • Multiple languages: VS Code

Some web-based IDEs have appeared in recent times too e.g., Amazon's Cloud9 IDE.

Some experienced developers, in particular those with a UNIX background, prefer lightweight yet powerful text editors with scripting capabilities (e.g. Emacs) over heavier IDEs.


Exercises:

Which of these are features available in IDEs?


W3.3b

Tools → IntelliJ IDEA → Project setup

Can setup a project in an IDE

Running IntelliJ IDEA for the First Time

A slightly more detailed explanation (from CodeLaunch) with some additional info at the end.


W3.3c

Tools → IntelliJ IDEA → Code navigation

Can navigate code effectively using IDE features

Some useful navigation shortcuts:

  1. Quickly locate a file by name.
  2. Go to the definition of a method from where it is used.
  3. Go back to the previous location.
  4. View the documentation of a method from where the method is being used, without navigating to the method itself.
  5. Find where a method/field is being used.

IntelliJ IDEA Code Navigation


Similar to last week, most topics for this week are TIC2002 topics given here for reference. But there are some new topics too (they are marked by one of these icons: , , , : OPTIONAL)