Week 4 [Mon, Sep 2nd] - Topics

Detailed Table of Contents


Guidance for the item(s) below:

Now that you know the basics about classes and objects, let's move to the next level. The sections below explain the third core concept of OOP (called inheritance) and how to use that in Java.

  1. abstraction
  2. encapsulation
  3. inheritance
  4. ...

[W4.1] OOP + Java: Inheritance

W4.1a

Paradigms → OOP → Inheritance → What

Video

Can explain the meaning of inheritance

The OOP concept Inheritance allows you to define a new class based on an existing class.

For example, you can use inheritance to define an EvaluationReport class based on an existing Report class so that the EvaluationReport class does not have to duplicate data/behaviors that are already implemented in the Report class. The EvaluationReport can inherit the wordCount attribute and the print() method from the base class Report.

  • Other names for Base class: Parent class, Superclass
  • Other names for Derived class: Child class, Subclass, Extended class

A superclass is said to be more general than the subclass. Conversely, a subclass is said to be more specialized than the superclass.

Applying inheritance on a group of similar classes can result in the common parts among classes being extracted into more general classes.

Man and Woman behave the same way for certain things. However, the two classes cannot be simply replaced with a more general class Person because of the need to distinguish between Man and Woman for certain other things. A solution is to add the Person class as a superclass (to contain the code common to men and women) and let Man and Woman inherit from Person class.

Inheritance implies the derived class can be considered as a subtype of the base class (and the base class is a super-type of the derived class), resulting in an is a relationship.

Inheritance does not necessarily mean a subtype relationship exists. However, the two often go hand-in-hand. For simplicity, at this point let us assume inheritance implies a subtype relationship.

To continue the previous example,

  • Woman is a Person
  • Man is a Person

Inheritance relationships through a chain of classes can result in inheritance hierarchies (aka inheritance trees).

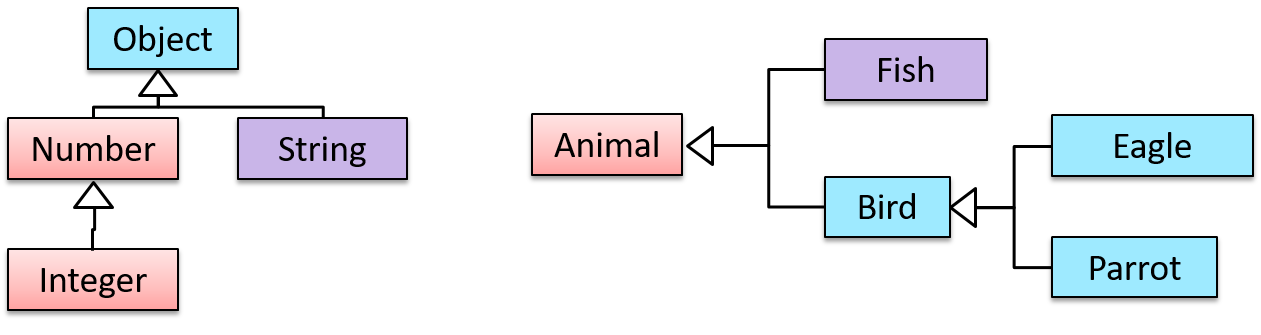
Two inheritance hierarchies/trees are given below. Note that the triangle points to the parent class. Observe how the Parrot is a Bird as well as it is an Animal.

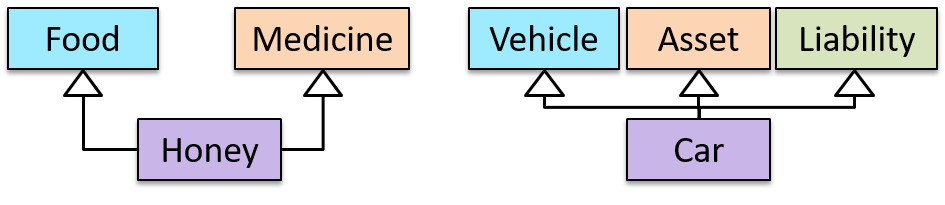
Multiple Inheritance is when a class inherits directly from multiple classes. Multiple inheritance among classes is allowed in some languages (e.g., Python, C++) but not in other languages (e.g., Java, C#).

The Honey class inherits from the Food class and the Medicine class because honey can be consumed as a food as well as a medicine (in some oriental medicine practices). Similarly, a Car is a Vehicle, an Asset and a Liability.


Exercises:

Which statements are correct?


W4.1b

Paradigms → OOP → Inheritance → Overloading

Can explain method overloading

Method overloading is when there are multiple methods with the same name but different type signatures. Overloading is used to indicate that multiple operations do similar things but take different parameters.

Type signature: The type signature of an operation is the type sequence of the parameters. The return type and parameter names are not part of the type signature. However, the parameter order is significant.

Example:

Method Type Signature
int add(int X, int Y) (int, int)
void add(int A, int B) (int, int)
void m(int X, double Y) (int, double)
void m(double X, int Y) (double, int)

In the case below, the calculate method is overloaded because the two methods have the same name but different type signatures (String) and (int).

  • calculate(String): void
  • calculate(int): void

W4.1c

Paradigms → OOP → Inheritance → Overriding

Can explain method overriding

Method overriding is when a subclass changes the behavior inherited from the parent class by re-implementing the method. Overridden methods have the same name, the same type signature, and the same (or a subtype of the) return type.

Consider the following case of EvaluationReport class inheriting the Report class:

Report methods EvaluationReport methods Overrides?
print() print() Yes
write(String) write(String) Yes
read():String read(int):String No. Reason: the two methods have different signatures; This is a case of overloading (rather than overriding).

Exercises


W4.1d

C++ to Java → Inheritance → Inheritance (Basics)

Video

Can use basic inheritance

Given below is an extract from the -- Java Tutorial, with slight adaptations.

A class that is derived from another class is called a subclass (also a derived class, extended class, or child class). The class from which the subclass is derived is called a superclass (also a base class or a parent class).

A subclass inherits all the members (fields, methods, and nested classes) from its superclass. Constructors are not members, so they are not inherited by subclasses, but the constructor of the superclass can be invoked from the subclass.

Every class has one and only one direct superclass (single inheritance), except the Object class, which has no superclass, . In the absence of any other explicit superclass, every class is implicitly a subclass of Object. Classes can be derived from classes that are derived from classes that are derived from classes, and so on, and ultimately derived from the topmost class, Object. Such a class is said to be descended from all the classes in the inheritance chain stretching back to Object. Java does not support multiple inheritance among classes.

The java.lang.Object class defines and implements behavior common to all classes—including the ones that you write. In the Java platform, many classes derive directly from Object, other classes derive from some of those classes, and so on, forming a single hierarchy of classes.

The keyword extends indicates one class inheriting from another.

Here is the sample code for a possible implementation of a Bicycle class and a MountainBike class that is a subclass of the Bicycle:

public class Bicycle {

    public int gear;
    public int speed;

    public Bicycle(int startSpeed, int startGear) {
        gear = startGear;
        speed = startSpeed;
    }

    public void setGear(int newValue) {
        gear = newValue;
    }

    public void applyBrake(int decrement) {
        speed -= decrement;
    }

    public void speedUp(int increment) {
        speed += increment;
    }

}
public class MountainBike extends Bicycle {

    // the MountainBike subclass adds one field
    public int seatHeight;

    // the MountainBike subclass has one constructor
    public MountainBike(int startHeight, int startSpeed, int startGear) {
        super(startSpeed, startGear);
        seatHeight = startHeight;
    }

    // the MountainBike subclass adds one method
    public void setHeight(int newValue) {
        seatHeight = newValue;
    }
}

A subclass inherits all the fields and methods of the superclass. In the example above, MountainBike inherits all the fields and methods of Bicycle and adds the field seatHeight and a method to set it.

Accessing superclass members

If your method overrides one of its superclass's methods, you can invoke the overridden method through the use of the keyword super. You can also use super to refer to a (although hiding fields is discouraged).

Consider this class, Superclass and a subclass, called Subclass, that overrides printMethod():

public class Superclass {

    public void printMethod() {
        System.out.println("Printed in Superclass.");
    }
}
public class Subclass extends Superclass {

    // overrides printMethod in Superclass
    public void printMethod() {
        super.printMethod();
        System.out.println("Printed in Subclass");
    }
    public static void main(String[] args) {
        Subclass s = new Subclass();
        s.printMethod();
    }
}

Printed in Superclass.
Printed in Subclass

Within Subclass, the simple name printMethod() refers to the one declared in Subclass, which overrides the one in Superclass. So, to refer to printMethod() inherited from Superclass, Subclass must use a qualified name, using super as shown.

Subclass constructors

A subclass constructor can invoke the superclass constructor. Invocation of a superclass constructor must be the first line in the subclass constructor. The syntax for calling a superclass constructor is super() (which invokes the no-argument constructor of the superclass) or super(parameters) (to invoke the superclass constructor with a matching parameter list).

The following example illustrates how to use the super keyword to invoke a superclass's constructor. Recall from the Bicycle example that MountainBike is a subclass of Bicycle. Here is the MountainBike (subclass) constructor that calls the superclass constructor and then adds some initialization code of its own (i.e., seatHeight = startHeight;):

public MountainBike(
        int startHeight, int startSpeed, int startGear) {

    super(startSpeed, startGear);
    seatHeight = startHeight;
}

Note: If a constructor does not explicitly invoke a superclass constructor, the Java compiler automatically inserts a call to the no-argument constructor of the superclass. If the superclass does not have a no-argument constructor, you will get a compile-time error. Object does have such a constructor, so if Object is the only superclass, there is no problem.

Access modifiers (simplified)

Access level modifiers determine whether other classes can use a particular field or invoke a particular method. Given below is a simplified version of Java access modifiers, assuming you have not yet started placing your classes in different packages i.e., all classes are placed in the root level. A full explanation of access modifiers is given in a later topic.

There are two levels of access control:

  1. At the class level:

    • public: the class is visible to all other classes
    • no modifier: same as public

  2. At the member level:

    • public : the member is visible to all other classes
    • protected: same as public
    • no modifier: same as public
    • private: the member is not visible to other classes (but can be accessed in its own class)

Resources:

A very beginner-friendly video about implementing Java inheritance.


Exercises:

[Key Exercise] inherit the Task class

Background: Suppose we are creating a software to manage various tasks a person has to do. Two types of such tasks are,

  • Todos: i.e., things that needs to be done some day e.g., 'Read the book Lord of the Rings'
  • Deadlines: i.e., things to be done by a specific date/time e.g., 'Read the text book by Nov 25th'

The Task class is given below:

public class Task {
    protected String description;

    public Task(String description) {
        this.description = description;
    }

    public String getDescription() {
        return description;
    }
}
  1. Write a Todo class that inherits from the Task class.
    • It should have an additional boolean field isDone to indicate whether the todo is done or not done.
    • It should have a isDone() method to access the isDone field and a setDone(boolean) method to set the isDone field.
  2. Write a Deadline class that inherits from the Todo class that you implemented in the previous step. It should have,
    • an additional String field by to store the details of when the task to be done e.g., Jan 25th 5pm
    • a getBy() method to access the value of the by field, and a corresponding setBy(String) method.
    • a constructor of the form Deadline(String description, String by)

The expected behavior of the two classes is as follows:

public class Main {
    public static void main(String[] args) {
        // create a todo task and print details
        Todo t = new Todo("Read a good book");
        System.out.println(t.getDescription());
        System.out.println(t.isDone());

        // change todo fields and print again
        t.setDone(true);
        System.out.println(t.isDone());

        // create a deadline task and print details
        Deadline d = new Deadline("Read textbook", "Nov 16");
        System.out.println(d.getDescription());
        System.out.println(d.isDone());
        System.out.println(d.getBy());

        // change deadline details and print again
        d.setDone(true);
        d.setBy("Postponed to Nov 18th");
        System.out.println(d.isDone());
        System.out.println(d.getBy());
    }
}

Read a good book
false
true
Read textbook
false
Nov 16
true
Postponed to Nov 18th

Hint


W4.1e

C++ to Java → Inheritance → The Object class

Video

Can use Object class

As you know, all Java objects inherit from the Object class. Let us look at some of the useful methods in the Object class that can be used by other classes.

The toString method

Every class inherits a toString method from the Object class that is used by Java to get a string representation of the object e.g., for printing. By default, it simply returns the type of the object and its address (in hexadecimal).

Suppose you defined a class called Time, to represent a moment in time. If you create a Time object and display it with println:

class Time {
    int hours;
    int minutes;
    int seconds;

    Time(int hours, int minutes, int seconds) {
        this.hours = hours;
        this.minutes = minutes;
        this.seconds = seconds;
    }
}
 Time t = new Time(5, 20, 13);
 System.out.println(t);

Time@80cc7c0 (the address part can vary)

You can override the toString method in your classes to provide a more meaningful string representation of the objects of that class.

Here's an example of overriding the toString method of the Time class:

class Time{

     //...

     @Override
     public String toString() {
         return String.format("%02d:%02d:%02d\n",
                 this.hours, this.minutes, this.seconds);
     }
}
 Time t = new Time(5, 20, 13);
 System.out.println(t);

05:20:13

@Override is an optional annotation you can use to indicate that the method is overriding a method from the parent class.

The equals method

There are two ways to check whether values are equal: the == operator and the equals method. With objects you can use either one, but they are not the same.

  • The == operator checks whether objects are identical; that is, whether they are the same object.
  • The equals method checks whether they are equivalent; that is, whether they have the same value.

The definition of identity is always the same, so the == operator always does the same thing.

Consider the following variables:

Time time1 = new Time(9, 30, 0);
Time time2 = time1;
Time time3 = new Time(9, 30, 0);
  • The assignment operator copies references, so time1 and time2 refer to the same object. Because they are identical, time1 == time2 is true.
  • But time1 and time3 refer to different objects. Because they are not identical, time1 == time3 is false.

By default, the equals method inherited from the Object class does the same thing as ==. As the definition of equivalence is different for different classes, you can override the equals method to define your own criteria for equivalence of objects of your class.

Here's how you can override the equals method of the Time class to provide an equals method that considers two Time objects equivalent as long as they represent the same time of the day:

public class Time {
    int hours;
    int minutes;
    int seconds;

    // ...

    @Override
    public boolean equals(Object o) {
        Time other = (Time) o;
        return this.hours == other.hours
                && this.minutes == other.minutes
                && this.seconds == other.seconds;
    }
}
Time t1 = new Time(5, 20, 13);
Time t2 = new Time(5, 20, 13);
System.out.println(t1 == t2);
System.out.println(t1.equals(t2));

false
true

Note that a proper equals method implementation is more complex than the example above. See the article How to Implement Java’s equals Method Correctly by Nicolai Parlog for a detailed explanation before you implement your own equals method.


Exercises:

[Key Exercise] override the toString method

Suppose you have the following classes Task, Todo, Deadline:

public class Task {
    protected String description;

    public Task(String description) {
        this.description = description;
    }

    public String getDescription() {
        return description;
    }
}
public class Todo extends Task {
    protected boolean isDone;

    public Todo(String description) {
        super(description);
        isDone = false;
    }

    public void setDone(boolean done) {
        isDone = done;
    }

    public boolean isDone() {
        return isDone;
    }
}
public class Deadline extends Todo {

    protected String by;

    public Deadline(String description, String by) {
        super(description);
        this.by = by;
    }

    public void setBy(String by) {
        this.by = by;
    }

    public String getBy() {
        return by;
    }
}

Override the toString method of the three classes to produce the following behavior.

public class Main {
    public static void main(String[] args) {
        // create a todo task and print it
        Todo t = new Todo("Read a good book");
        System.out.println(t);

        // change todo fields and print again
        t.setDone(true);
        System.out.println(t);

        // create a deadline task and print it
        Deadline d = new Deadline("Read textbook", "Nov 16");
        System.out.println(d);

        // change deadline details and print again
        d.setDone(true);
        d.setBy("Postponed to Nov 18th");
        System.out.println(d);
    }
}

description: Read a good book
is done? No
description: Read a good book
is done? Yes
description: Read textbook
is done? No
do by: Nov 16
description: Read textbook
is done? Yes
do by: Postponed to Nov 18th

You can use the super.toString from the subclass to invoke the behavior of the method you are overriding. This is useful here because the overriding method is simply adding onto the behavior of the overridden method.

Hint


Guidance for the item(s) below:

Inheritance is even more powerful when combined with polymorphism (which also happens to be the fourth core concept of OOP), explained in the sections below.

  1. abstraction
  2. encapsulation
  3. inheritance
  4. polymorphism

[W4.2] OOP + Java: Polymorphism

W4.2a

Paradigms → OOP → Polymorphism → What

Video

Can explain OOP polymorphism

Polymorphism:

The ability of different objects to respond, each in its own way, to identical messages is called polymorphism. -- Object-Oriented Programming with Objective-C, Apple

Polymorphism allows you to write code targeting superclass objects, use that code on subclass objects, and achieve possibly different results based on the actual class of the object.

Assume classes Cat and Dog are both subclasses of the Animal class. You can write code targeting Animal objects and use that code on Cat and Dog objects, achieving possibly different results based on whether it is a Cat object or a Dog object. Some examples:

  • Declare an array of type Animal and still be able to store Dog and Cat objects in it.
  • Define a method that takes an Animal object as a parameter and yet be able to pass Dog and Cat objects to it.
  • Call a method on a Dog or a Cat object as if it is an Animal object (i.e., without knowing whether it is a Dog object or a Cat object) and get a different response from it based on its actual class e.g., call the Animal class's method speak() on object a and get a "Meow" as the return value if a is a Cat object and "Woof" if it is a Dog object.

Polymorphism literally means "ability to take many forms".


W4.2b

Paradigms → OOP → Inheritance → Substitutability

Can explain substitutability

Every instance of a subclass is an instance of the superclass, but not vice-versa. As a result, inheritance allows substitutability: the ability to substitute a child class object where a parent class object is expected.

An AcademicStaff is an instance of a Staff, but a Staff is not necessarily an instance of an AcademicStaff. i.e. wherever an object of the superclass is expected, it can be substituted by an object of any of its subclasses.

The following code is valid because an AcademicStaff object is substitutable as a Staff object.

Staff staff = new AcademicStaff(); // OK

But the following code is not valid because staff is declared as a Staff type and therefore its value may or may not be of type AcademicStaff, which is the type expected by variable academicStaff.

Staff staff;
...
AcademicStaff academicStaff = staff; // Not OK

W4.2c : OPTIONAL

Paradigms → OOP → Inheritance → Dynamic and static binding


W4.2d : OPTIONAL

Paradigms → OOP → Polymorphism → How


W4.2e

C++ to Java → Inheritance → Polymorphism

Video

Can use polymorphism in Java

Java is a strongly-typed language which means the code works with only the object types that it targets.

The following code PetShelter keeps a list of Cat objects and make them speak. The code will not work with any other type, for example, Dog objects.

public class PetShelter {
    private static Cat[] cats = new Cat[]{
            new Cat("Mittens"),
            new Cat("Snowball")};

    public static void main(String[] args) {
        for (Cat c: cats){
            System.out.println(c.speak());
        }
    }
}

Mittens: Meow
Snowball: Meow

The Cat class


This strong-typing can lead to unnecessary verbosity caused by repetitive similar code that do similar things with different object types.

If the PetShelter is to keep both cats and dogs, you'll need two arrays and two loops:

public class PetShelter {
    private static Cat[] cats = new Cat[]{
            new Cat("Mittens"),
            new Cat("Snowball")};
    private static Dog[] dogs = new Dog[]{
            new Dog("Spot")};

    public static void main(String[] args) {
        for (Cat c: cats){
            System.out.println(c.speak());
        }
        for(Dog d: dogs){
            System.out.println(d.speak());
        }
    }
}

Mittens: Meow
Snowball: Meow
Spot: Woof

The Dog class


A better way is to take advantage of polymorphism to write code that targets a superclass so that it works with any subclass objects.

The PetShelter2 uses one data structure to keep both types of animals and one loop to make them speak. The code targets the Animal superclass (assuming Cat and Dog inherits from the Animal class) instead of repeating the code for each animal type.

public class PetShelter2 {
    private static Animal[] animals = new Animal[]{
            new Cat("Mittens"),
            new Cat("Snowball"),
            new Dog("Spot")};

    public static void main(String[] args) {
        for (Animal a: animals){
            System.out.println(a.speak());
        }
    }
}

Mittens: Meow
Snowball: Meow
Spot: Woof

The Animal, Cat, and Dog classes


Explanation: Because Java supports polymorphism, you can store both Cat and Dog objects in an array of Animal objects. Similarly, you can call the speak method on any Animal object (as done in the loop) and yet get different behavior from Cat objects and Dog objects.

Suggestion: try to add an Animal object (e.g., new Animal("Unnamed")) to the animals array and see what happens.

Polymorphic code is better in several ways:

  • It is shorter.
  • It is simpler.
  • It is more flexible (in the above example, the main method will work even if we add more animal types).

Resources:

Exercises:

[Key Exercise] print shape area

The Main class below keeps a list of Circle and Rectangle objects and prints the area (as an int value) of each shape when requested.

Add the missing variables/methods to the code below so that it produces the output given.

public class Main {
    //TODO add your methods here

    public static void main(String[] args) {
        addShape(new Circle(5));
        addShape(new Rectangle(3, 4));
        addShape(new Circle(10));
        printAreas();
        addShape(new Rectangle(4, 4));
        printAreas();
    }
}

78
12
314
78
12
314
16

Circle class and Rectangle class is given below but you'll need to add a parent class Shape.

public class Circle extends Shape {

    private int radius;

    public Circle(int radius) {
        this.radius = radius;
    }

    @Override
    public int area() {
        return (int)(Math.PI * radius * radius);
    }
}
public class Rectangle extends Shape{
    private int height;
    private int width;

    public Rectangle(int height, int width){
        this.height = height;
        this.width = width;
    }

    @Override
    public int area() {
        return height * width;
    }
}

You may use an array of size 100 to store the shapes.

Partial solution


Hint


Guidance for the item(s) below:

As you start adding features to your project iteratively, you'll need a way to detect if the new code breaks the existing code. Next, let's learn a rather simple way to do that using a certain type of testing (we'll be learning more sophisticated methods in later weeks).

[W4.3] Automated Testing of Text UIs

W4.3a

Quality Assurance → Testing → Introduction → What

Video

Can explain testing

Testing: Operating a system or component under specified conditions, observing or recording the results, and making an evaluation of some aspect of the system or component. –- source: IEEE

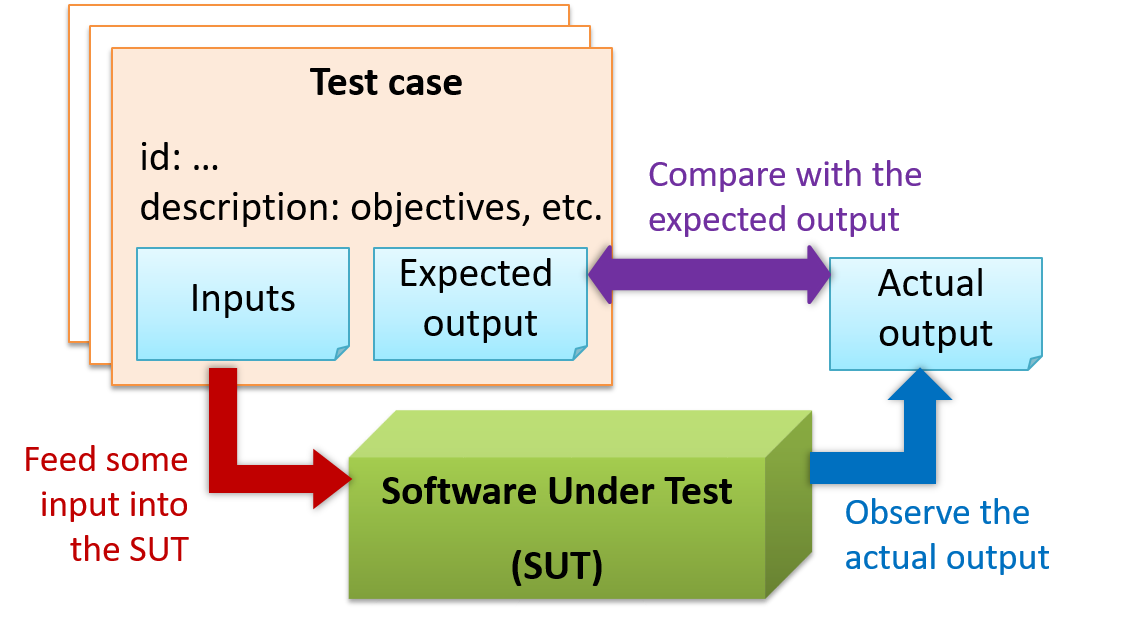
When testing, you execute a set of test cases. A test case specifies how to perform a test. At a minimum, it specifies the input to the software under test (SUT) and the expected behavior.

Example: A minimal test case for testing a browser:

  • Input – Start the browser using a blank page (vertical scrollbar disabled). Then, load longfile.html located in the test data folder.
  • Expected behavior – The scrollbar should be automatically enabled upon loading longfile.html.
Other details a test case can contain ... extra

Test cases can be determined based on the specification, reviewing similar existing systems, or comparing to the past behavior of the SUT.

For each test case you should do the following:

  1. Feed the input to the SUT
  2. Observe the actual output
  3. Compare actual output with the expected output

A test case failure is a mismatch between the expected behavior and the actual behavior. A failure indicates a potential defect (or a bug) -- we say 'potential' because the error could be in the test case itself.

Example: In the browser example above, a test case failure is implied if the scrollbar remains disabled after loading longfile.html. The defect/bug causing that failure could be an uninitialized variable.

A deeper look at the definition of testing extra


W4.3b

Quality Assurance → Testing → Regression Testing → What

Video

Can explain regression testing

When you modify a system, the modification may result in some unintended and undesirable effects on the system. Such an effect is called a regression.

Regression testing is the re-testing of the software to detect regressions. The typical way to detect regressions is retesting all related components, even if they had been tested before.

Regression testing is more effective when it is done frequently, after each small change. However, doing so can be prohibitively expensive if testing is done manually. Hence, regression testing is more practical when it is automated.


Exercises:

Regression Testing definition: T/F?


W4.3c

Quality Assurance → Testing → Test Automation → What

Can explain test automation

An automated test case can be run programmatically and the result of the test case (pass or fail) is determined programmatically. Compared to manual testing, automated testing reduces the effort required to run tests repeatedly and increases precision of testing (because manual testing is susceptible to human errors).


W4.3d

Quality Assurance → Testing → Test Automation → Automated testing of CLI applications

Video

Can semi-automate testing of CLIs

A simple way to semi-automate testing of a CLI (Command Line Interface) app is by using input/output re-direction. Here are the high-level steps:

  • First, you feed the app with a sequence of test inputs that is stored in a file while redirecting the output to another file.
  • Next, you compare the actual output file with another file containing the expected output.

Let's assume you are testing a CLI app called AddressBook. Here are the detailed steps:

  1. Store the test input in the text file input.txt.

    Example input.txt


  2. Store the output you expect from the SUT in another text file expected.txt.

    Example expected.txt


  3. Run the program as given below, which will redirect the text in input.txt as the input to AddressBook and similarly, will redirect the output of AddressBook to a text file output.txt. Note that this does not require any changes in AddressBook code.

    java AddressBook < input.txt > output.txt
    
    • The way to run a CLI program differs based on the language.
      e.g., In Python, assuming the code is in AddressBook.py file, use the command
      python AddressBook.py < input.txt > output.txt

    • If you are using Windows, use a normal MS-DOS terminal (i.e., cmd.exe) to run the app, not a PowerShell window.

  4. Next, you compare output.txt with the expected.txt. This can be done using a utility such as Windows' FC (i.e. File Compare) command, Unix's diff command, or a GUI tool such as WinMerge.

    FC output.txt expected.txt
    

Note that the above technique is only suitable when testing CLI apps, and only if the exact output can be predetermined. If the output varies from one run to the other (e.g. it contains a time stamp), this technique will not work. In those cases, you need more sophisticated ways of automating tests.


Guidance for the item(s) below:

Now that you know how to use IDE basic features, it's worth looking at even more ways of leveraging their power. In particular, the debugging feature can be indispensable at times.

[W4.4] IDEs: Intermediate Features

W4.4a

Implementation → IDEs → Debugging → What

Video

Can explain debugging

Debugging is the process of discovering defects in the program. Here are some approaches to debugging:

  • Bad -- By inserting temporary print statements: This is an ad-hoc approach in which print statements are inserted in the program to print information relevant to debugging, such as variable values. e.g. Exiting process() method, x is 5.347. This approach is not recommended due to these reasons:
    • Incurs extra effort when inserting and removing the print statements.
    • These extraneous program modifications increase the risk of introducing errors into the program.
    • These print statements, if not removed promptly after the debugging, may even appear unexpectedly in the production version.
  • Bad -- By manually tracing through the code: Otherwise known as ‘eye-balling’, this approach doesn't have the cons of the previous approach, but it too is not recommended (other than as a 'quick try') due to these reasons:
    • It is a difficult, time consuming, and error-prone technique.
    • If you didn't spot the error while writing the code, you might not spot the error when reading the code either.
  • Good -- Using a debugger: A debugger tool allows you to pause the execution, then step through the code one statement at a time while examining the internal state if necessary. Most IDEs come with an inbuilt debugger. This is the recommended approach for debugging.

W4.4b

Tools → IntelliJ IDEA → Debugging: Basic

Can step through a program using a debugger

This video (from LaunchCode) gives a pretty good explanation of how to use the IntelliJ IDEA debugger.


W4.4c : OPTIONAL

Tools → IntelliJ IDEA → Productivity shortcuts


Guidance for the item(s) below:

Let's learn how to create a pull request (PRs) on GitHub; you need to create one for your project this week.

[W4.5] RCS: Creating Pull Requests

W4.5a

Tools → Git and GitHub → Creating PRs

Can create PRs on GitHub

Suppose you want to propose some changes to a GitHub repo (e.g., samplerepo-pr-practice) as a pull request (PR).

samplerepo-pr-practice is an unmonitored repo you can use to practice working with PRs. Feel free to send PRs to it.

Given below is a scenario you can try in order to learn how to create PRs:

1. Fork the repo onto your GitHub account.

2. Clone it onto your computer.

3. Commit your changes e.g., add a new file with some contents and commit it.

  • Option A - Commit changes to the master branch
  • Option B - Commit to a new branch e.g., create a branch named add-intro (remember to switch to the master branch before creating a new branch) and add your commit to it.

4. Push the branch you updated (i.e., master branch or the new branch) to your fork, as explained here.

5. Initiate the PR creation:

  1. Go to your fork.

  2. Click on the Pull requests tab followed by the New pull request button. This will bring you to the Compare changes page.

  3. Set the appropriate target repo and the branch that should receive your PR, using the base repository and base dropdowns. e.g.,
    base repository: se-edu/samplerepo-pr-practice base: master

    Normally, the default value shown in the dropdown is what you want but in case your fork has , the default may not be what you want.

  4. Indicate which repo:branch contains your proposed code, using the head repository and compare dropdowns. e.g.,
    head repository: myrepo/samplerepo-pr-practice compare: master

6. Verify the proposed code: Verify that the diff view in the page shows the exact change you intend to propose. If it doesn't, as necessary.

7. Submit the PR:

  1. Click the Create pull request button.

  2. Fill in the PR name and description e.g.,
    Name: Add an introduction to the README.md
    Description:

    Add some paragraph to the README.md to explain ...
    Also add a heading ...
    
  3. If you want to indicate that the PR you are about to create is 'still work in progress, not yet ready', click on the dropdown arrow in the Create pull request button and choose Create draft pull request option.

  4. Click the Create pull request button to create the PR.

  5. Go to the receiving repo to verify that your PR appears there in the Pull requests tab.

The next step of the PR lifecycle is the PR review. The members of the repo that received your PR can now review your proposed changes.

  • If they like the changes, they can merge the changes to their repo, which also closes the PR automatically.
  • If they don't like it at all, they can simply close the PR too i.e., they reject your proposed change.
  • In most cases, they will add comments to the PR to suggest further changes. When that happens, GitHub will notify you.

You can update the PR along the way too. Suppose PR reviewers suggested a certain improvement to your proposed code. To update your PR as per the suggestion, you can simply modify the code in your local repo, commit the updated code to the same branch as before, and push to your fork as you did earlier. The PR will auto-update accordingly.

Sending PRs using the master branch is less common than sending PRs using separate branches. For example, suppose you wanted to propose two bug fixes that are not related to each other. In that case, it is more appropriate to send two separate PRs so that each fix can be reviewed, refined, and merged independently. But if you send PRs using the master branch only, both fixes (and any other change you do in the master branch) will appear in the PRs you create from it.

To create another PR while the current PR is still under review, create a new branch (remember to switch back to the master branch first), add your new proposed change in that branch, and create a new PR following the steps given above.

It is possible to create PRs within the same repo e.g., you can create a PR from branch feature-x to the master branch, within the same repo. Doing so will allow the code to be reviewed by other developers (using PR review mechanism) before it is merged.

Problem: merge conflicts in ongoing PRs, indicated by the message This branch has conflicts that must be resolved. That means the upstream repo's master branch has been updated in a way that the PR code conflicts with that master branch. Here is the standard way to fix this problem:

  1. Pull the master branch from the upstream repo to your local repo.
    git checkout master
    git pull upstream master
    
  2. In the local repo, attempt to merge the master branch (that you updated in the previous step) onto the PR branch, in order to bring over the new code in the master branch to your PR branch.
    git checkout pr-branch  # assuming pr-branch is the name of branch in the PR
    git merge master
    
  3. The merge you are attempting will run into a merge conflict, due to the aforementioned conflicting code in the master branch. Resolve the conflict manually (this topic is covered elsewhere), and complete the merge.
  4. Push the PR branch to your fork. As the updated code in that branch no longer is conflicting with the master branch, the merge conflict alert in the PR will go away automatically.