Week 8 [Mon, Oct 7th] - Topics
Last week, you learned intermediate-level class diagram notation. But the quiz only focused on interpreting such diagrams. This week, we cover the aspect of drawing intermediate-level class diagrams to match code. Here are what you can do:
1. Do Part 1 of this week's quiz (which covers the same area).
2. Watch the worked examples in the following videos to learn the process of drawing intermediate-level class diagrams to match code.
Guidance for the item(s) below:
This week, we learn a few design principles that you can try to apply in your project.
These principles build on top of the design fundamentals you learned earlier (i.e., abstraction, coupling, cohesion).
Guidance for the item(s) below:
As you add more and more Java classes to your project, keeping all those classes in the same directory becomes untenable. The solution is covered in the next topic.
Guidance for the item(s) below:
As the size of your Java codebase grows, every class being able to access every member of every other class can be problematic. Hence, there should be a way to control the access to our Java classes and their members. The solution is given in the topic below.
Guidance for the item(s) below:
As you know, adding comments to the code is a good practice. Let's learn about a specific type of comments that you can use in Java code that can do even more than just explain the code.
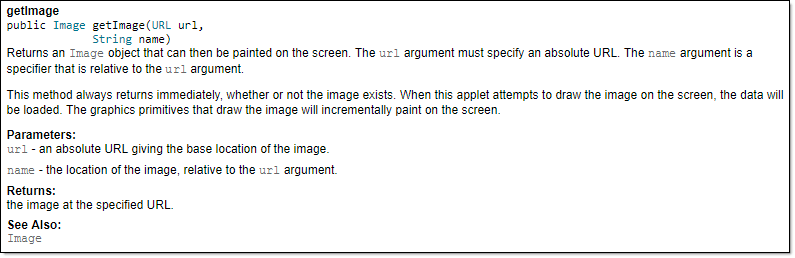
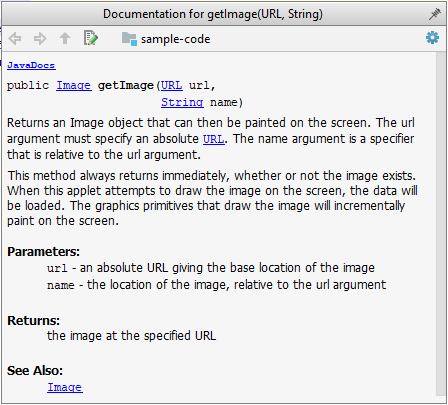
Can explain JavaDoc
JavaDoc is a tool for generating API documentation in HTML format from comments in the source code. In addition, modern IDEs use JavaDoc comments to generate explanatory tooltips.
An example method header comment in JavaDoc format:
/**
 * Returns an Image object that can then be painted on the screen.
 * The url argument must specify an absolute {@link URL}. The name
 * argument is a specifier that is relative to the url argument.
 * <p>
 * This method always returns immediately, whether or not the
 * image exists. When this applet attempts to draw the image on
 * the screen, the data will be loaded. The graphics primitives
 * that draw the image will incrementally paint on the screen.
 *
 * @param url An absolute URL giving the base location of the image.
 * @param name The location of the image, relative to the url argument.
 * @return The Image at the specified URL.
 * @see Image
 */
public Image getImage(URL url, String name) {
    try {
        return getImage(new URL(url, name));
    } catch (MalformedURLException e) {
        return null;
    }
}
Generated HTML documentation:
Tooltip generated by IntelliJ IDE:
Guidance for the item(s) below:
Let's learn about a few more Git techniques, starting with branching. Although these techniques are not really needed for the iP, we require you to use them in the iP so that you have more time to practice them before they are really needed in the tP.
Can explain branching
Branching is the process of evolving multiple versions of the software in parallel. For example, one team member can create a new branch and add an experimental feature to it while the rest of the team keeps working on another branch. Branches can be given names e.g. master, release, dev.
A branch can be merged into another branch. Merging sometimes results in a new commit (called the merge commit) being created, to represent the cumulative changes done in the receiving branch as a result of the merge.
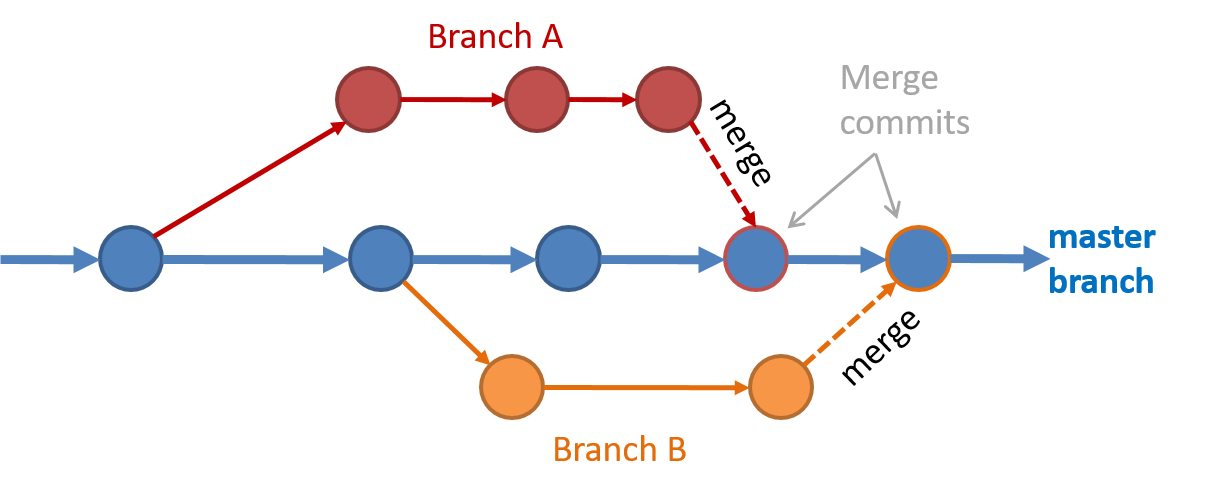 Branching and merging
 Merge conflicts happen when you try to merge two branches that had changed the same part of the code and the RCS cannot decide which changes to keep. In those cases, you have to ‘resolve’ the conflicts manually.
Can use Git branching
Git supports branching, which allows you to do multiple parallel changes to the content of a repository.
First, let us learn how the repo looks like as you perform branching operations.
A Git branch is simply a named label pointing to a commit which moves forward automatically as you add more commits to that branch. The HEAD label indicates which branch you are on.
Git creates a branch named master (or main) by default. When you add a commit, it goes into the branch you are currently on, and the branch label (together with the HEAD label) moves to the new commit.
Given below is an illustration of how branch labels move as branches evolve. Refer to the text below it for explanations of each stage.
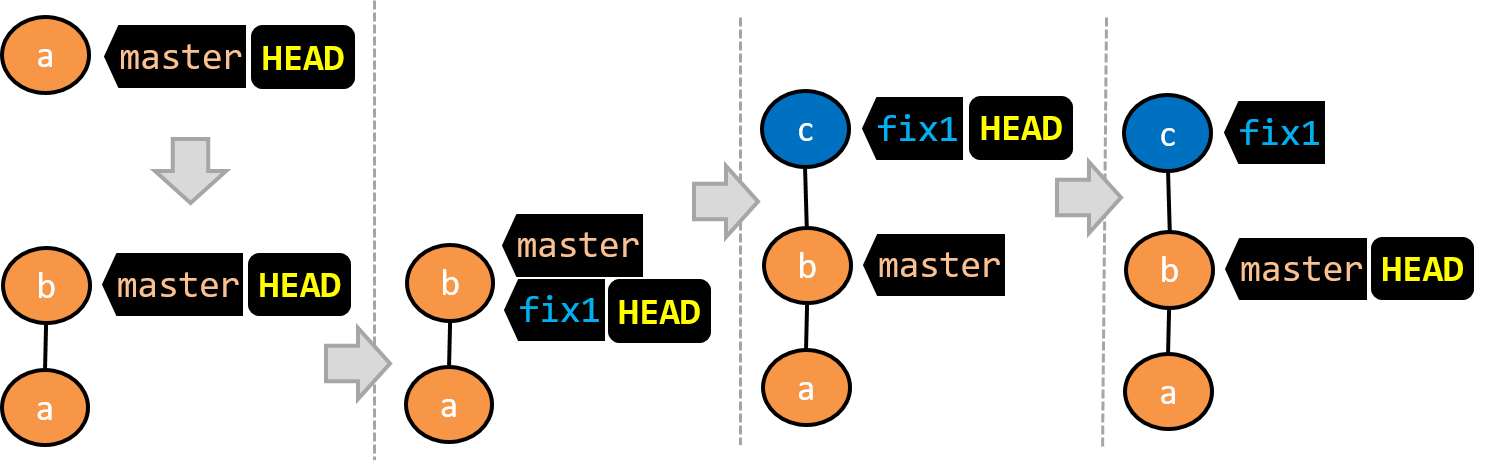
There is only one branch (i.e.,
master) and there is only one commit on it. TheHEADlabel is pointing to themasterbranch (as we are currently on that branch).To learn a bit more about how labels such as
masterandHEADwork, you can refer to this article.A new commit has been added. The
masterand theHEADlabels have moved to the new commit.A new branch
fix1has been added. The repo has switched to the new branch too (hence, theHEADlabel is attached to thefix1branch).A new commit (
c) has been added. The current branch labelfix1moves to the new commit, together with theHEADlabel.The repo has switched back to the
masterbranch. Hence, theHEADhas moved back tomasterbranch's .
At this point, the repo's working directory reflects the code at commitb(notc).
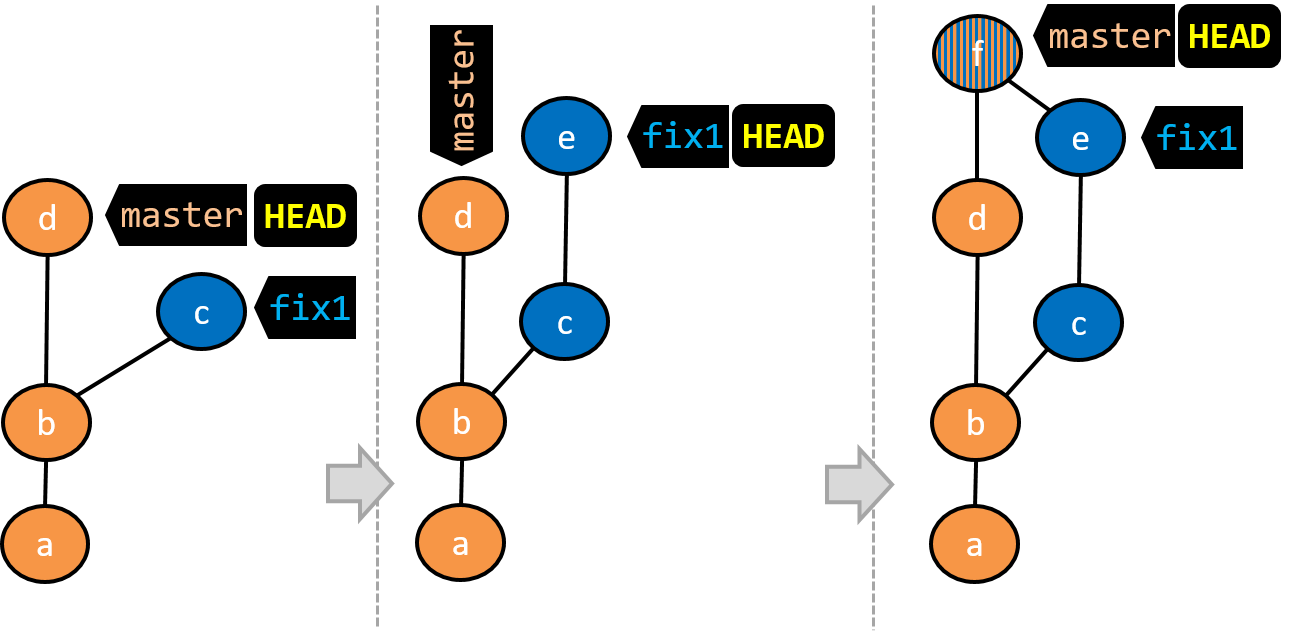
- A new commit (
d) has been added. Themasterand theHEADlabels have moved to that commit. - The repo has switched back to the
fix1branch and added a new commit (e) to it. - The repo has switched to the
masterbranch and thefix1branch has been merged into themasterbranch, creating a merge commitf. The repo is currently on themasterbranch.
Now that you have some idea how the repo will look like when branches are being used, let's follow the steps below to learn how to perform branching operations using Git. You can use any repo you have on your computer (e.g. a clone of the samplerepo-things) for this.
Note that how the revision graph appears (colors, positioning, orientation etc.) in your Git GUI varies based on the GUI you use, and might not match the exact diagrams given above.
0. Observe that you are normally in the branch called master.
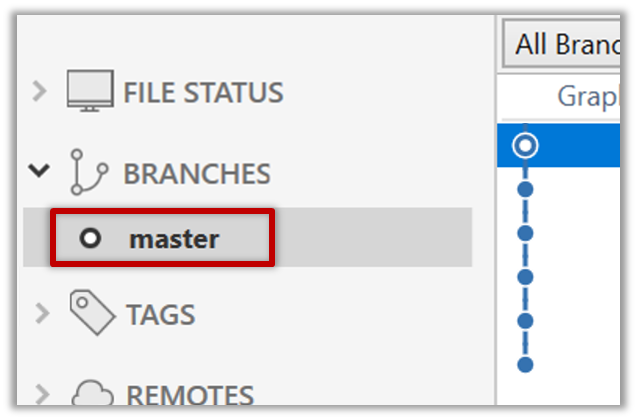
$ git status
on branch master
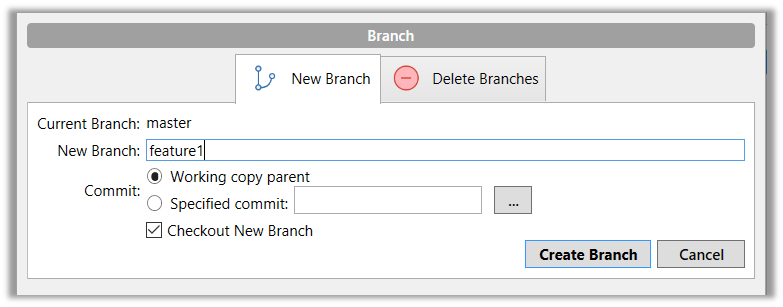
1. Start a branch named feature1 and switch to the new branch.
Click on the Branch button on the main menu. In the next dialog, enter the branch name and click Create Branch.
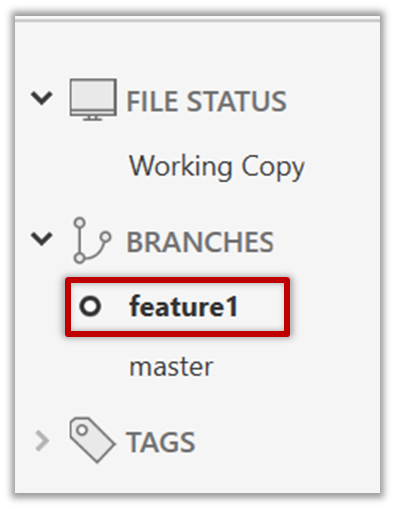
Note how the feature1 is indicated as the current branch (reason: Sourcetree automatically switches to the new branch when you create a new branch).
You can use the branch command to create a new branch and the checkout command to switch to a specific branch.
$ git branch feature1
$ git checkout feature1
One-step shortcut to create a branch and switch to it at the same time:
$ git checkout –b feature1
The new switch command
Git recently introduced a switch command that you can use instead of the checkout command given above.
To create a new branch and switch to it:
$ git branch feature1
$ git switch feature1
One-step shortcut:
$ git switch –c feature1
2. Create some commits in the new branch. Just commit as per normal. Commits you add while on a certain branch will become part of that branch.
Note how the master label and the HEAD label moves to the new commit (The HEAD label of the local repo is represented as in Sourcetree, as illustrated in the screenshot below).

3. Switch to the master branch. Note how the changes you did in the feature1 branch are no longer in the working directory.
Double-click the master branch.
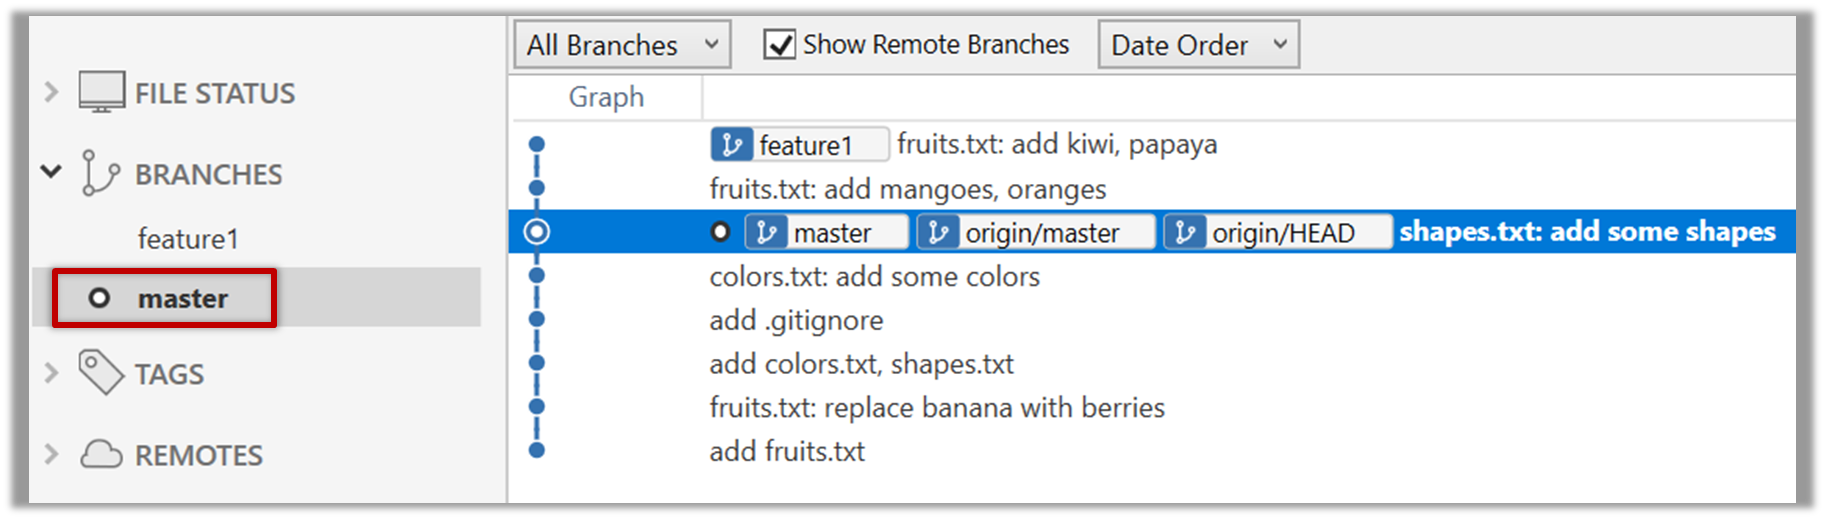
Revisiting master vs origin/master
In the screenshot above, you see a master label and a origin/master label for the same commit. The former identifies the of the local master branch while the latter identifies the tip of the master branch at the remote repo named origin. The fact that both labels point to the same commit means the local master branch and its remote counterpart are with each other.
Similarly, origin/HEAD label appearing against the same commit indicates that of the remote repo is pointing to this commit as well.
$ git checkout master
4. Add a commit to the master branch. Let’s imagine it’s a bug fix.
To keep things simple for the time being, this commit should not involve the same content that you changed in the feature1 branch. To be on the safe side, you can change an entirely different file in this commit.
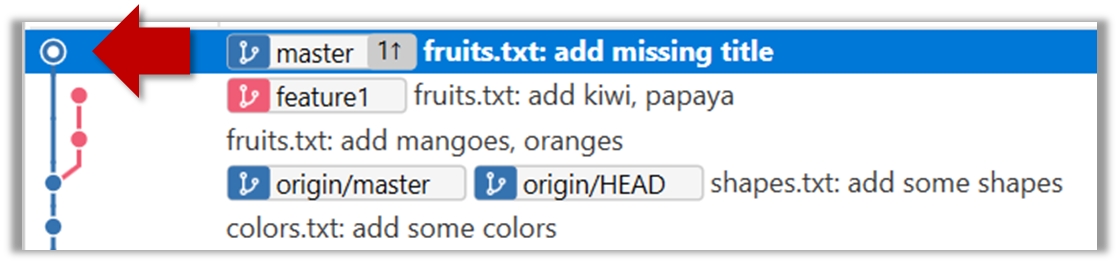
5. Switch back to the feature1 branch (similar to step 3).
6. Merge the master branch to the feature1 branch, giving an end-result like the following. Also note how Git has created a merge commit.
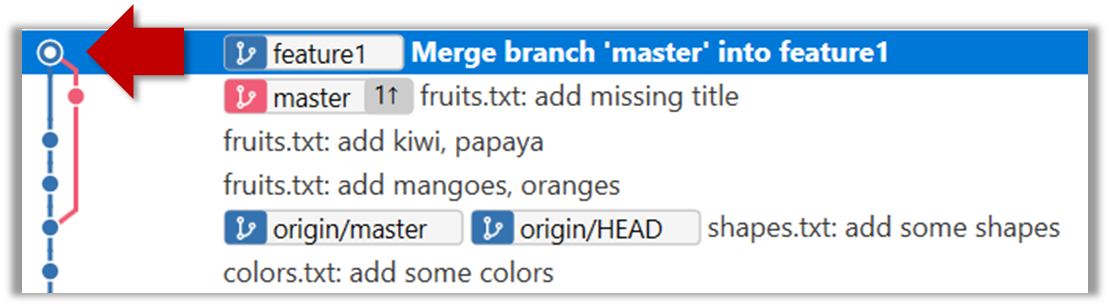
Right-click on the master branch and choose merge master into the current branch. Click OK in the next dialog.
$ git merge master
The objective of that merge was to sync the feature1 branch with the master branch. Observe how the changes you did in the master branch (i.e. the imaginary bug fix) is now available even when you are in the feature1 branch.
To undo a merge,
- Ensure you are in the .
- Do a hard reset (similar to how you delete a commit) of that branch to the commit that would be the tip of that branch had you not done the offending merge.
In the example below, you merged master to feature1.
If you want to undo that merge,
- Ensure you are in the
feature1branch (because that's the branch that received the merge). - Reset the
feature1branch to the commit highlighted (in yellow) in the screenshot above (because that was the tip of thefeature1branch before you merged themasterbranch to it.
Instead of merging master to feature1, an alternative is to rebase the feature1 branch. However, rebasing is an advanced feature that requires modifying past commits. If you modify past commits that have been pushed to a remote repository, you'll have to force-push the modified commit to the remote repo in order to update the commits in it.
7. Add another commit to the feature1 branch.
8. Switch to the master branch and add one more commit.
9. Merge feature1 to the master branch, giving and end-result like this:
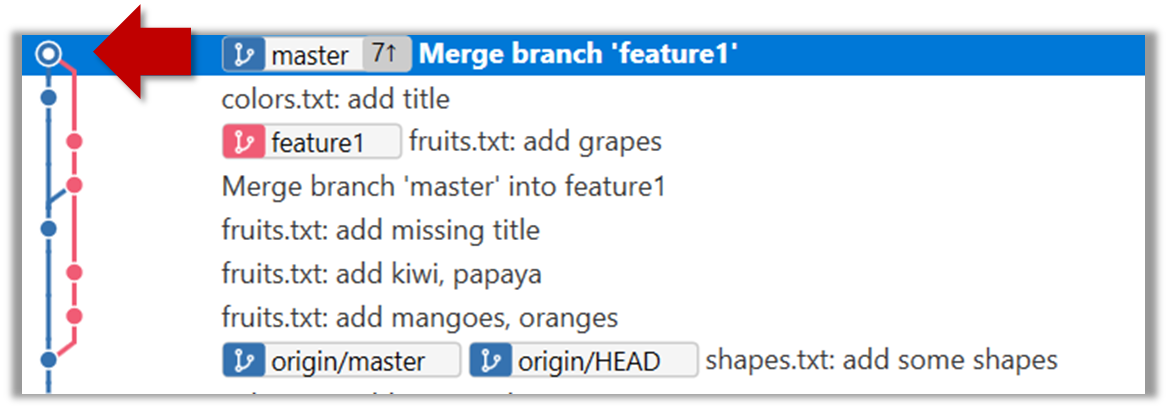
Right-click on the feature1 branch and choose Merge....
$ git merge feature1
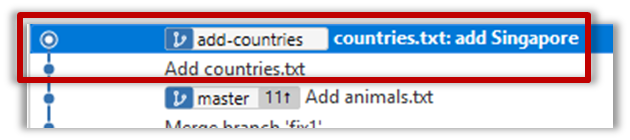
10. Create a new branch called add-countries, switch to it, and add some commits to it (similar to steps 1-2 above). You should have something like this now:
Avoid this rookie mistake!
Always remember to switch back to the master branch before creating a new branch. If not, your new branch will be created on top of the current branch.
11. Go back to the master branch and merge the add-countries branch onto the master branch (similar to steps 8-9 above). While you might expect to see something like the following,
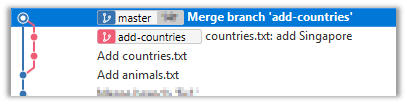
... you are likely to see something like this instead:

That is because Git does a fast forward merge if possible. Seeing that the master branch has not changed since you started the add-countries branch, Git has decided it is simpler to just put the commits of the add-countries branch in front of the master branch, without going into the trouble of creating an extra merge commit.
It is possible to force Git to create a merge commit even if fast forwarding is possible.
Windows: Tick the box shown below when you merge a branch:
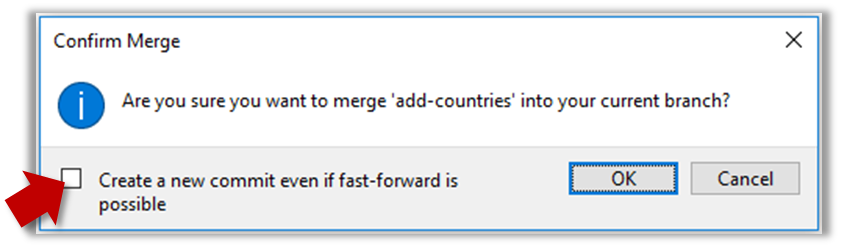
Mac:
- Go to Sourcetree
Settings. - Navigate to the
Gitsection. - Tick the box
Do not fast-forward when merging, always create commit.
Use the --no-ff switch (short for no fast forward):
$ git merge --no-ff add-countries
Can use Git to resolve merge conflicts
Merge conflicts happen when you try to combine two incompatible versions (e.g., merging a branch to another but each branch changed the same part of the code in a different way).
Here are the steps to simulate a merge conflict and use it to learn how to resolve merge conflicts.
0. Create an empty repo or clone an existing repo, to be used for this activity.
1. Start a branch named fix1 in the repo. Create a commit that adds a line with some text to one of the files.
2. Switch back to master branch. Create a commit with a conflicting change i.e. it adds a line with some different text in the exact location the previous line was added.
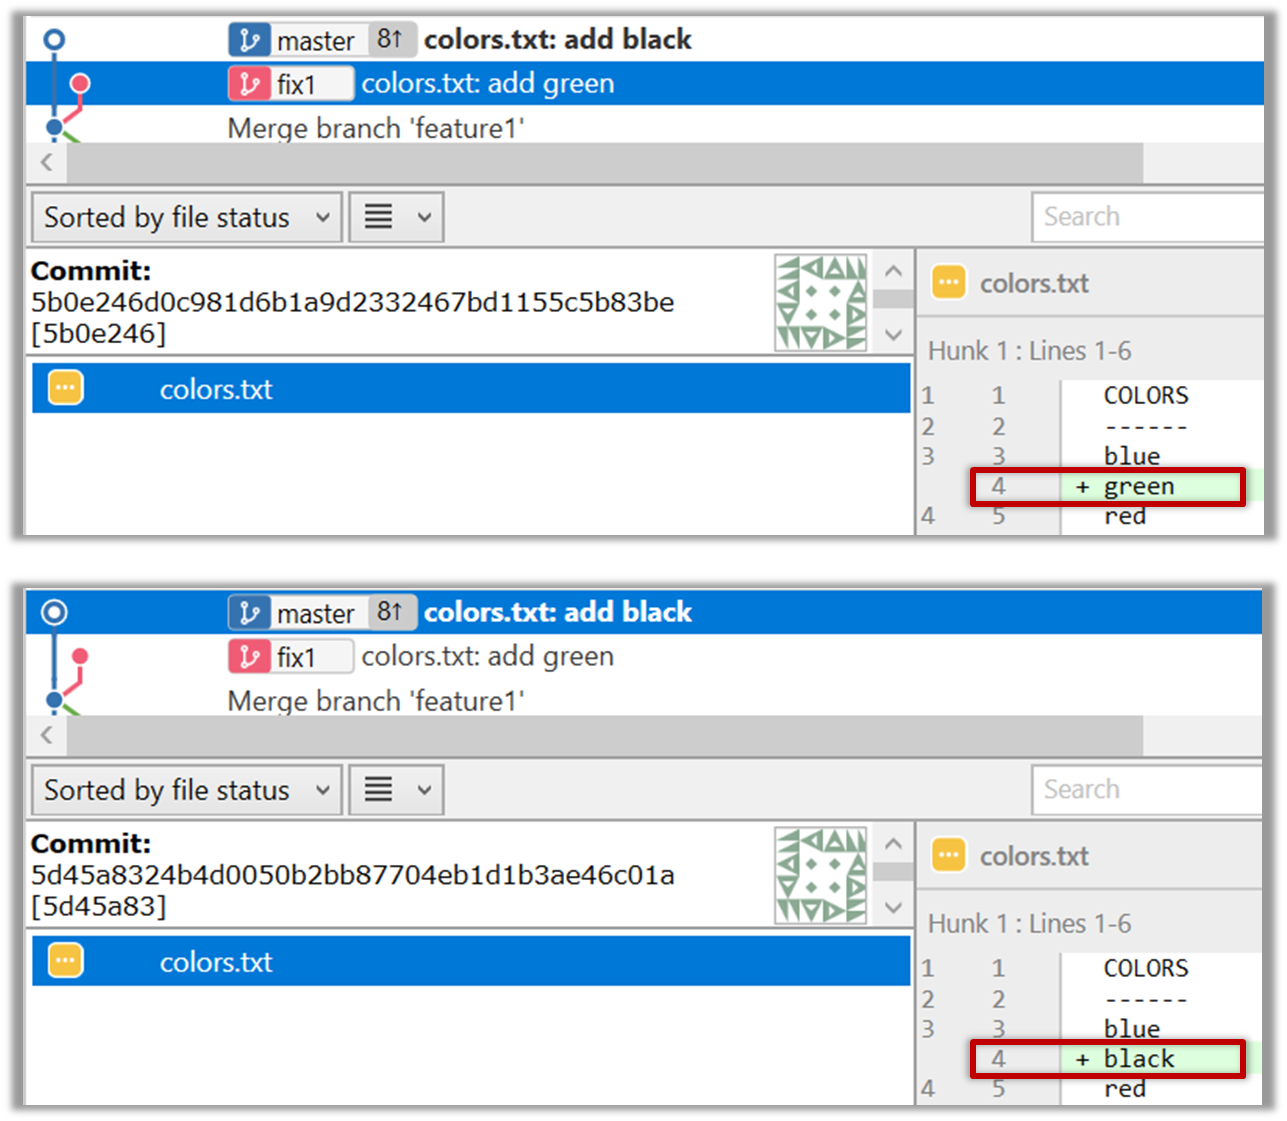
3. Try to merge the fix1 branch onto the master branch. Git will pause mid-way during the merge and report a merge conflict. If you open the conflicted file, you will see something like this:
COLORS
------
blue
<<<<<< HEAD
black
=======
green
>>>>>> fix1
red
white
4. Observe how the conflicted part is marked between a line starting with <<<<<< and a line starting with >>>>>>, separated by another line starting with =======.
Highlighted below is the conflicting part that is coming from the master branch:
blue
<<<<<< HEAD
black
=======
green
>>>>>> fix1
red
This is the conflicting part that is coming from the fix1 branch:
blue
<<<<<< HEAD
black
=======
green
>>>>>> fix1
red
5. Resolve the conflict by editing the file. Let us assume you want to keep both lines in the merged version. You can modify the file to be like this:
COLORS
------
blue
black
green
red
white
6. Stage the changes, and commit. You have now successfully resolved the merge conflict.
Can work with remote branches
Git branches in a local repo can be linked to a branch in a remote repo so the local branch can 'track' the corresponding remote branch, and revision history contained in the local and the remote branch pair can be synchronized as desired.
[A] Pushing a new branch to a remote repo
Let's see how you can push a branch that you created in your local repo to the remote repo. Note that this branch does not exist in the remote repo yet.
Given below is how to push a branch named add-intro to your own fork named samplerepo-pr-practice.
We assume that your local repo already has the remote added to it with the name origin. If that is not the case, you should first configure your local repo to be able to communicate with the target remote repo.
- Click on
Pushbutton, which opens up the Push dialog. - Choose the remote that you wish to push the branch (assuming you've added that repo to your Sourcetree already).
- Select the branch(es) you want to push -- in this case,
add-intro.
Ensure theTrack?checkbox is ticked for the selected branch(es). - Click
Push.
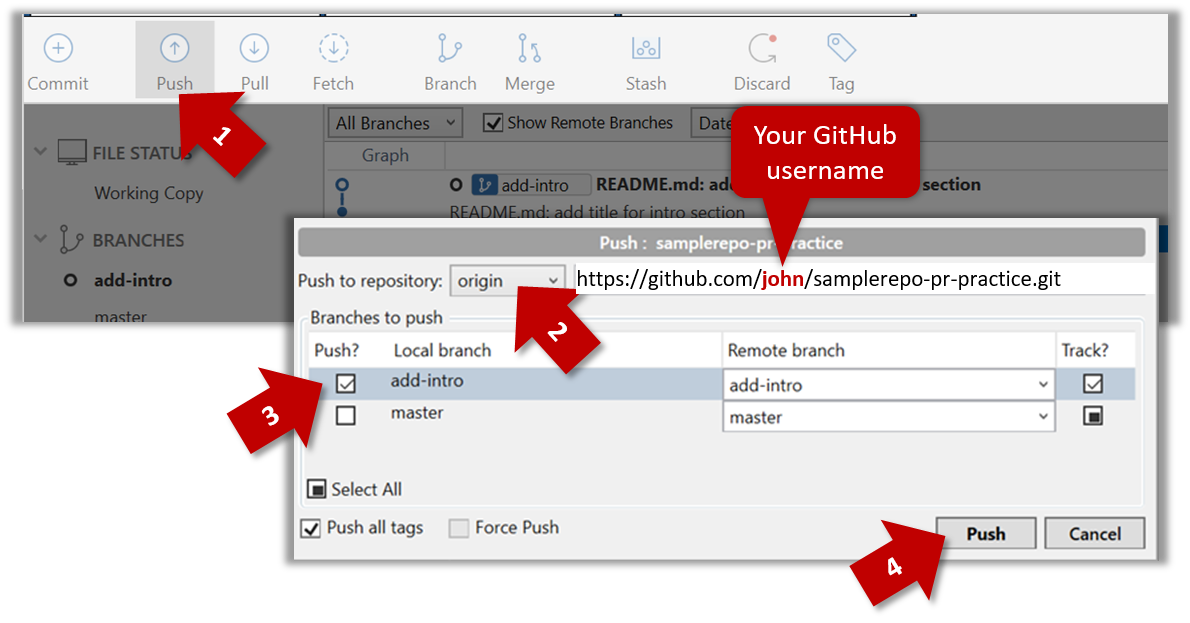
$ git push -u origin add-intro
The -u (or --set-upstream) flag tells Git that you wish the local branch to 'track' the remote branch that will be created as a result of this push.
See git-scm.com/docs/git-push for details of the push command.
[B] Pulling a remote branch for the first time
Here, let's see how to fetch a new branch (i.e., it does not exist in your local repo yet) from a remote repo.
1. Check the list of remote branches by expanding the REMOTES menu on the left edge of Sourcetree. If the branch you expected to find is missing, you can click the Fetch button (in the top toolbar) to refresh the information shown under remotes.
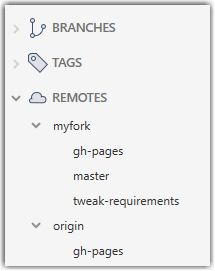
2. Double-click the branch name (e.g., tweak-requirements branch in the myfork remote), which should open the checkout dialog shown below.
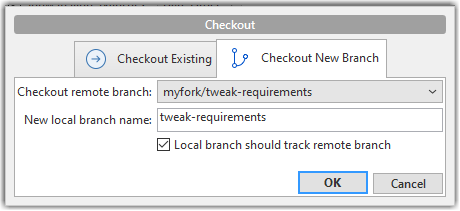
3. Go with the default settings (shown above) should be fine. Once you click OK, the branch will appear in your local repo. Furthermore, that repo will switch to that branch, and the local branch will the remote branch as well.
1. Fetch details from the remote. e.g., if the remote is named myfork
$ git fetch myfork
2. List the branches to see the name of the branch you want to pull.
$ git branch -a
master
remotes/myfork/master
remotes/myfork/branch1
-a flag tells Git to list both local and remote branches.
3. Create a matching local branch and switch to it.
$ git switch -c branch1 myfork/branch1
Switched to a new branch 'branch1'
branch 'branch1' set up to track 'myfork/branch1'.
-c flag tells Git to create a new local branch.
[C] Syncing branches
In this section we assume that you have a local branch that is already tracking a remote branch (e.g., as a result of doing [A] or [B] above).
[C1] To push new changes in the local branch to the corresponding remote branch:
Similar to how you pushed a new branch (in [A]):
Similar to [A] above, but omit the -u flag. e.g.,
$ git push origin add-intro
If you push but the remote branch has new commits that you don't have locally, Git will abort the push and will ask you to pull first.
[C2] To pull new changes from a remote branch to the corresponding local branch:
1. Switch to the branch you want to update by double-clicking the branch name. e.g.,
2. Pull the updated in the remote branch to the local branch by right-clicking on the branch name (in the same place as above), and choosing Pull <remote>/<branch> (tracked) e.g., Pull myfork/add-intro (tracked).
1. Switch to the branch you want to update using git checkout <branch> e.g.,
$ git checkout branch1
2. Pull the updated in the remote branch to the local branch, using git pull <remote> <branch> e.g.,
$ git pull origin branch1
If you pull but your local branch has new commits the remote branch doesn't have, Git will automatically perform a merge between the local branch and the remote branch.
Guidance for the item(s) below:
Given below are some very basic tools and techniques that are often used in planning, scheduling, and tracking projects.
Can explain buffers
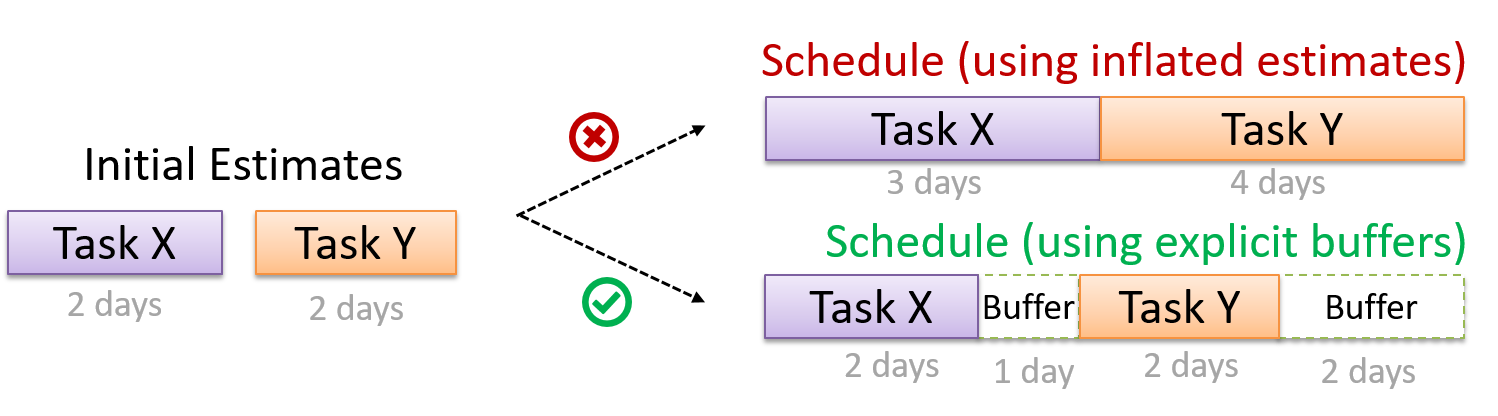
A buffer is time set aside to absorb any unforeseen delays. It is very important to include buffers in a software project schedule because effort/time estimations for software development are notoriously hard. However, do not inflate task estimates to create hidden buffers; have explicit buffers instead. Reason: With explicit buffers, it is easier to detect incorrect effort estimates which can serve as feedback to improve future effort estimates.
Can explain issue trackers
Keeping track of project tasks (who is doing what, which tasks are ongoing, which tasks are done etc.) is an essential part of project management. In small projects, it may be possible to keep track of tasks using simple tools such as online spreadsheets or general-purpose/light-weight task tracking tools such as Trello. Bigger projects need more sophisticated task tracking tools.
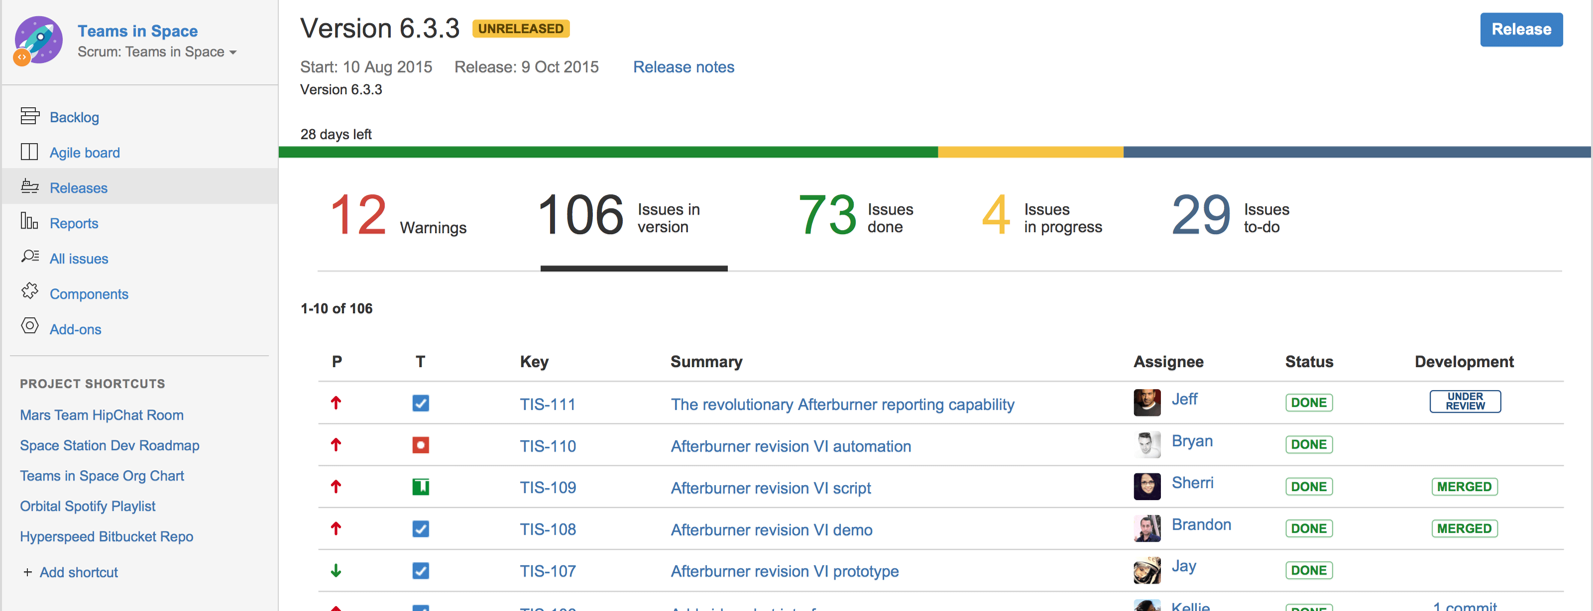
Issue trackers (sometimes called bug trackers) are commonly used to track task assignment and progress. Most online project management software such as GitHub, SourceForge, and BitBucket come with an integrated issue tracker.
A screenshot from the Jira Issue tracker software (Jira is part of the BitBucket project management tool suite):
Last week, you learned intermediate-level class diagram notation. But the quiz only focused on interpreting such diagrams. This week, we cover the aspect of drawing intermediate-level class diagrams to match code. Here are what you can do:
1. Do Part 1 of this week's quiz (which covers the same area).
2. Watch the worked examples in the following videos to learn the process of drawing intermediate-level class diagrams to match code.